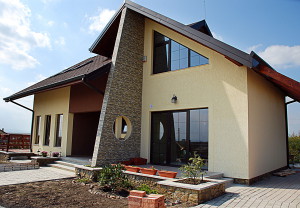
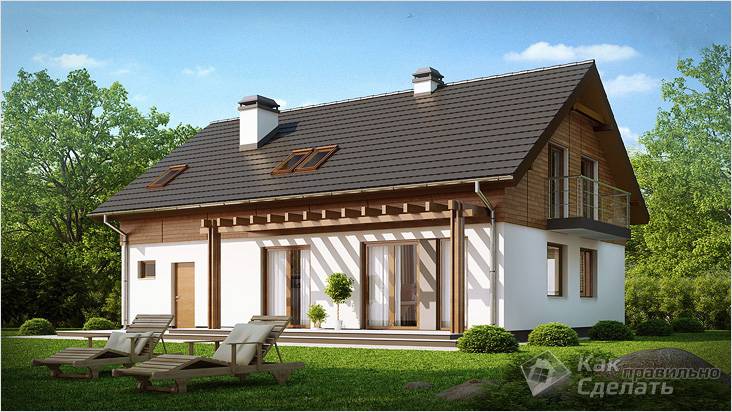
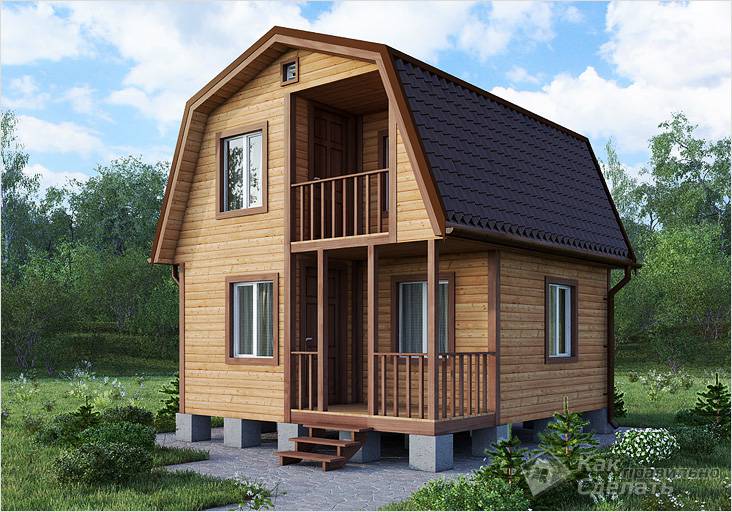
Based on such a criterion as cost-quality, the technology of erecting frame houses, which is shown in the photo and video, has an undoubted advantage and therefore is gaining momentum in our country. The advantages of frame construction include the following:
- Low cost of home.
- Small time costs for construction, as a team of 3 people can build a house from the foundation to the finish in 2 months.
- Good performance that saves money on building maintenance.
- Frame technology makes it possible to mount communications inside the walls, which is a feature of this type of house.
- To build a house does not require a powerful foundation.
- Work can be carried out at any temperature.
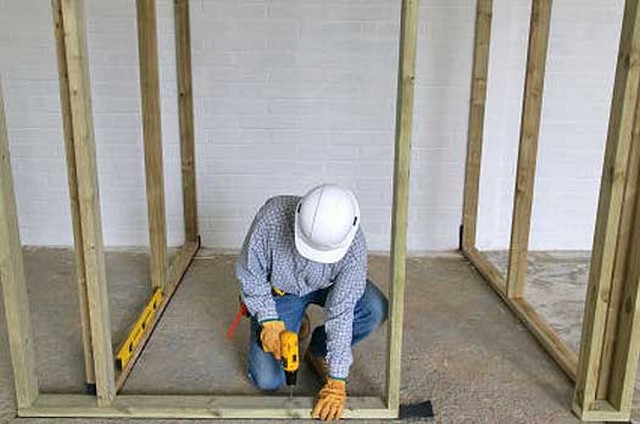
- During the construction process you will not have to use heavy equipment, since all elements of the house are relatively light in weight and can be moved and mounted by three people.
- The frame house is characterized by high seismic resistance.
- Long service life - the average life is about 80 years.
Having considered all the advantages of frame houses, we will learn how the phased construction of a frame house is carried out and which ones are there to choose the most optimal one for your house.
Varieties of foundation
The technology for building such a house is quite simple, but it is somewhat different from other varieties. If you have already completed the project and agreed with the relevant authorities, then it's time to start the first stage of construction.
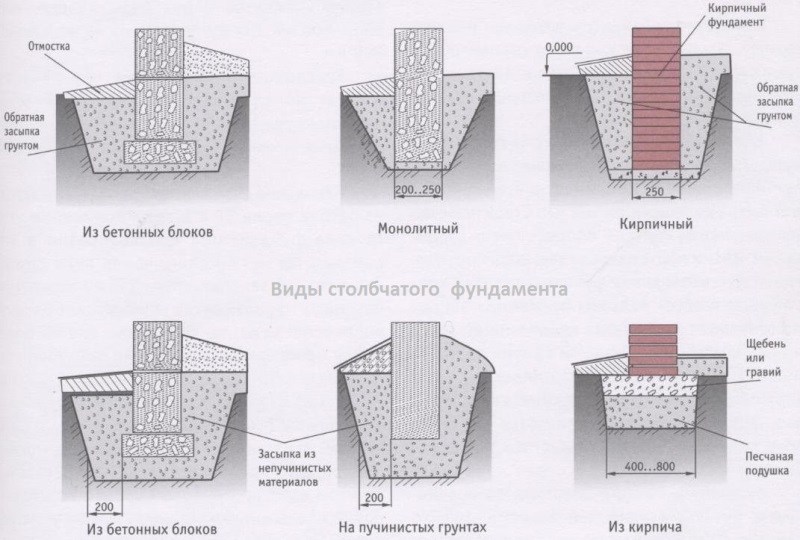
The foundation for a house built according to frame technology can be pile, columnar, slab or tape, each of them has its own characteristics. Before stopping on some type of foundation, it is advisable to view photos and videos of its construction in order to understand the process itself.
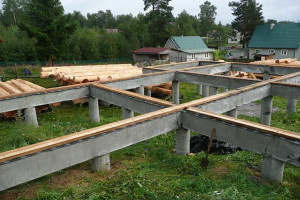
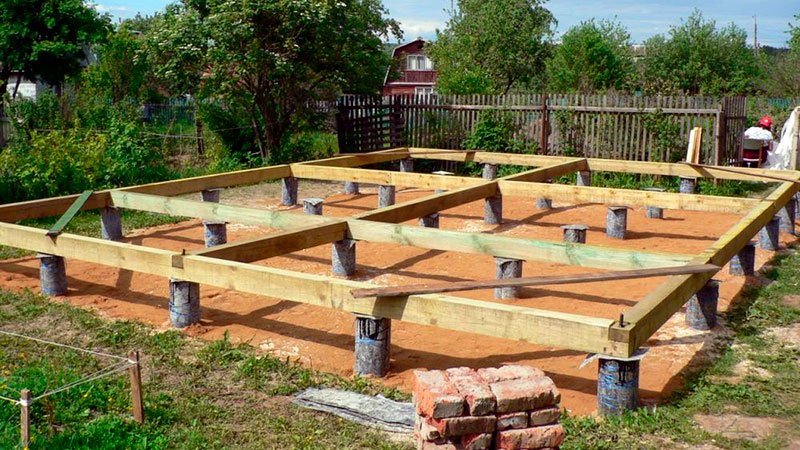
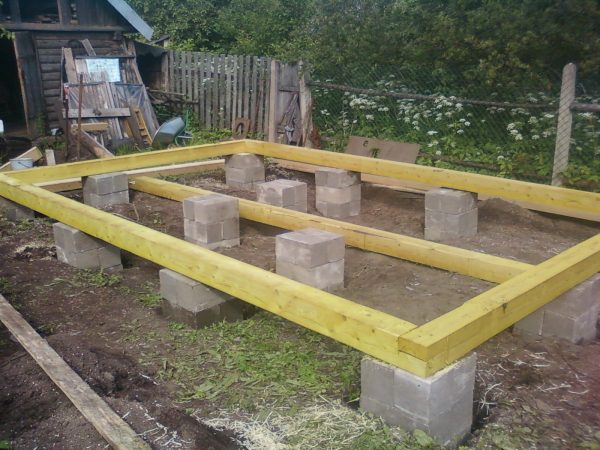
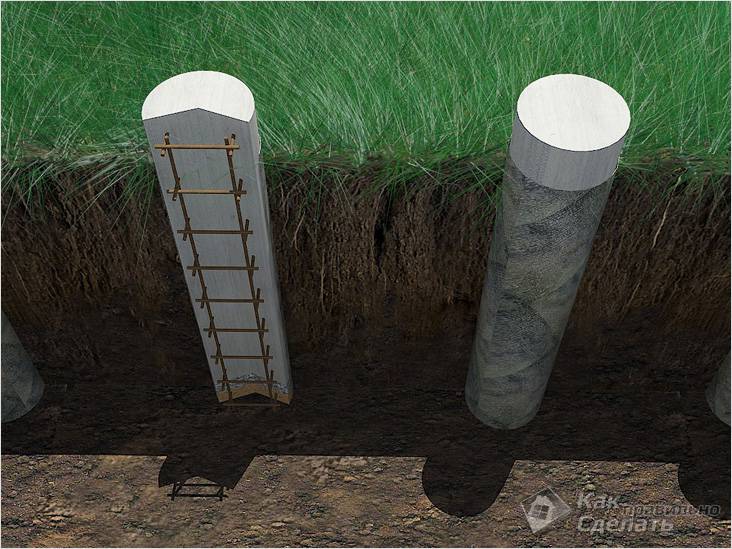
Column foundation
This type of foundation is the most attractive in terms of cost, and it is quite suitable for a frame house. The foundation is a column made of ready-made blocks on which the future housing will actually be placed.
Previously, for future columns, you need to make recesses according to the drawing, level the soil and arrange a sand cushion. Sand needs to be leveled, spilled with water and compacted. After that, install the blocks themselves on the cement mortar, and on top lay a layer of roofing material.
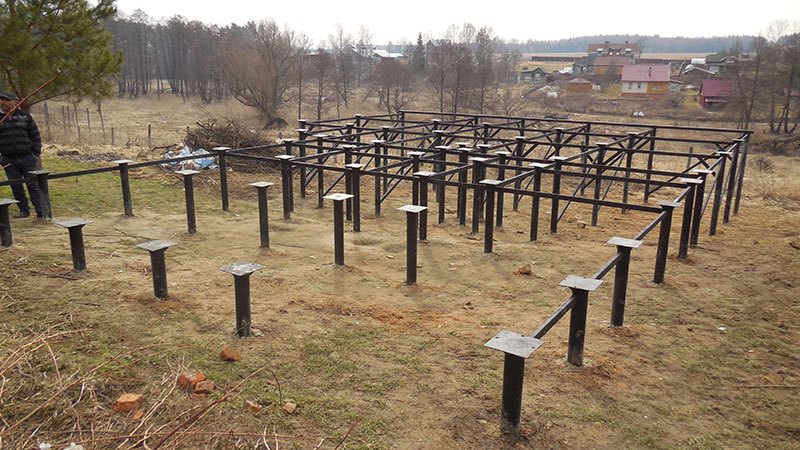
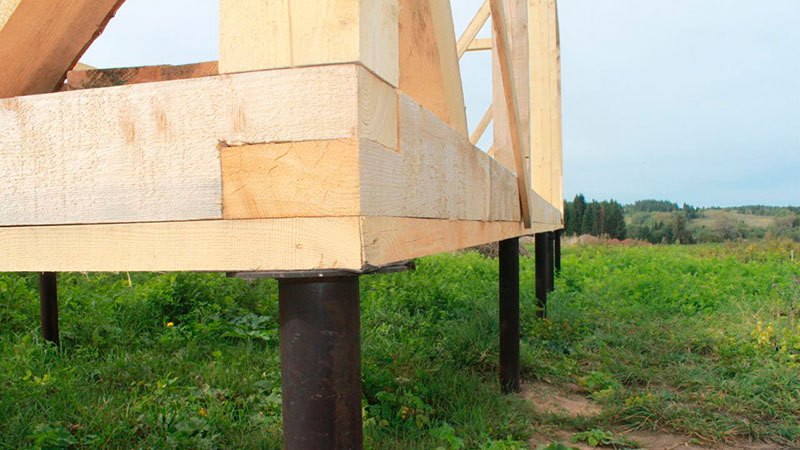
Pile foundation
This type of foundation is considered universal, it is suitable for any type of soil. It is a metal support screwed into the ground, which outwardly resembles a huge-sized screw with a thread and a pointed edge. Video and photos of such a foundation are attached.
Both the pile foundation and the column foundation will subsequently require a blocking device. The pickup is arranged between poles or piles in order to protect the underground space from cold and water. It can be done from boards or by masonry.
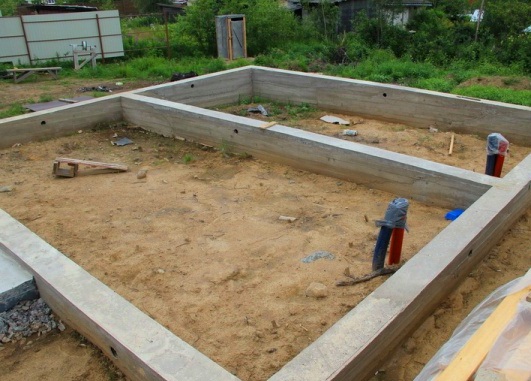
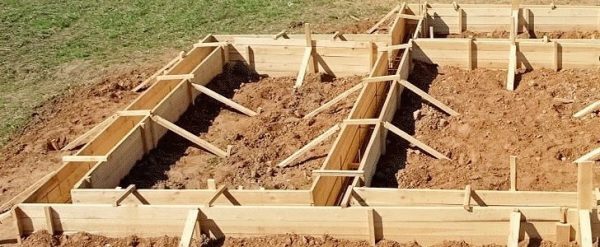
Tape monolithic foundation
- This is an inextricable monolithic structure, which is performed under all the bearing walls of the building. To create it, a larger amount of material will be required than for a pile foundation, but its advantage is that even on soft soils this design will not cause significant shrinkage due to the reinforcing cage that is installed in the foundation body. In addition, the owner will have the opportunity to build a basement in the future.
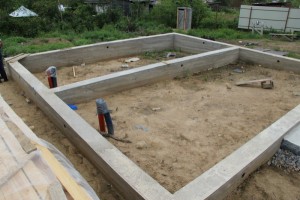
The only drawback of the strip foundation is that it is unreasonably expensive for this type of construction, since there is no need for a frame house to build such a reinforced foundation, although, judging by the photo, this method is also in demand.
Brick foundation
The traditional type of foundation, which is a regular brickwork in a particular embodiment. This is a fairly expensive foundation, and its reliability is slightly exaggerated. Such a foundation is rarely performed, especially for frame construction, as it is considered an obsolete variety. A photo or video, how to put it, can also be viewed on the site.
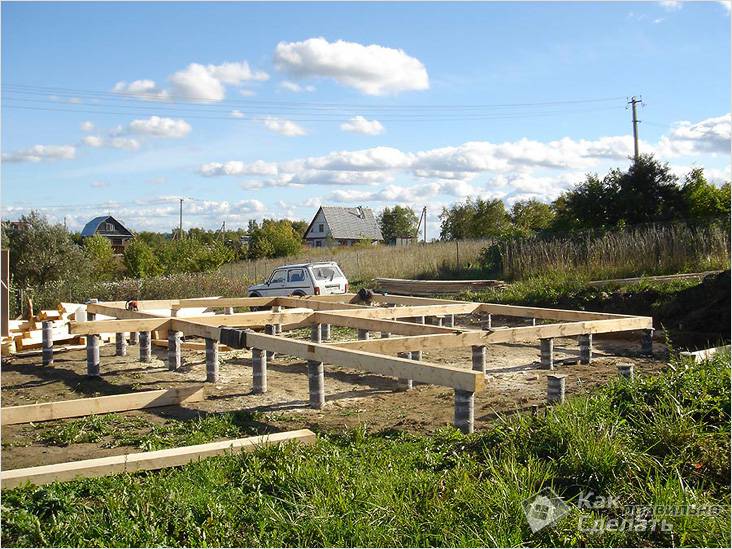
Harness and floors
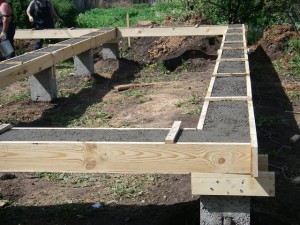
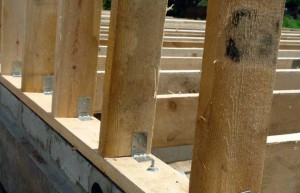
The phased construction of a frame house involves the implementation of strapping. A layer of waterproofing material is laid on the foundation, and then a number of beams are mounted, which are located around the entire perimeter, and, in addition, where it is planned to erect load-bearing interior walls. A prerequisite - before laying the beam, it must be thoroughly treated with an antiseptic. There are two ways to fix the bars of the lower harness:
![]()
- anchor bolts.
- on metal vertical pins, which are laid in the process of pouring concrete.
After completing the strapping process, we proceed to the installation of floor beams and the installation of vertical frame racks. As beams, you can use a bar with a cross section of 10x10 cm or a board 5-6 cm thick and 15 cm wide.
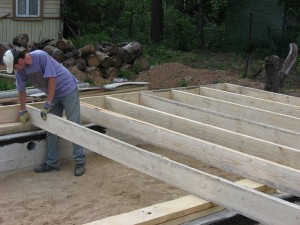
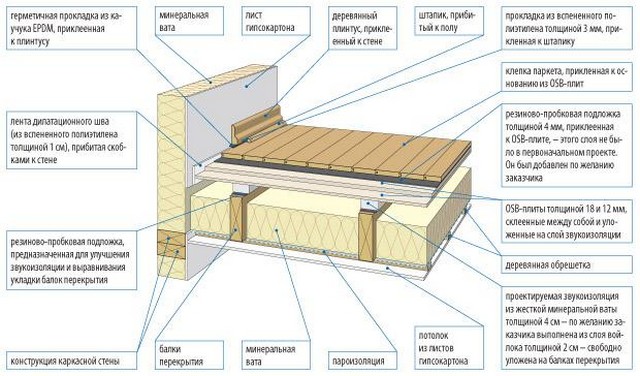
The beams are laid in increments of 60–70 cm. After this, a rough floor is laid from unedged boards. If it is required to make a warm floor, then logs are laid on the rough flooring and an insulation layer of mineral wool, expanded polystyrene or expanded clay gravel is made between them, having previously laid waterproofing material. The insulation is covered with a vapor barrier film and the installation of the finish coating from the floor grooved battens, laminate, parquet or ceramic tiles is carried out. The technology of these processes can also be seen in the video.
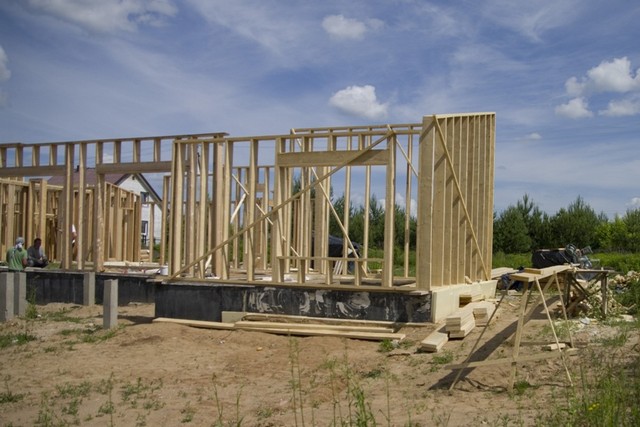
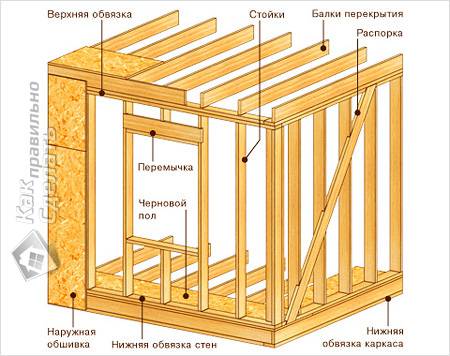
Wall assembly
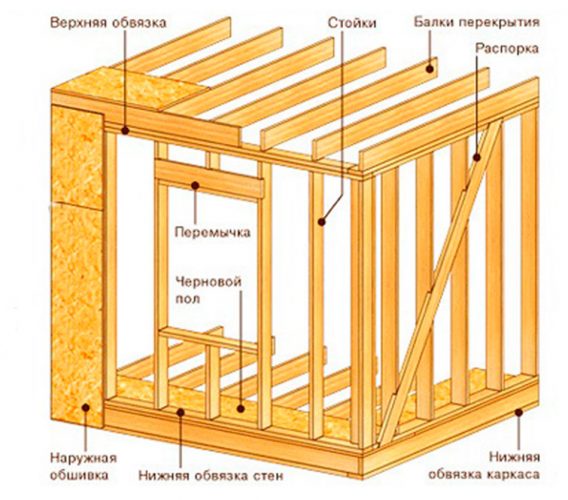
The lower harness, made of timber, should have grooves every 50 cm. Be sure to make sure that the dimensions of the groove correspond to the dimensions of the cross section of the vertical frame element. After installing all the uprights, you will need to proceed to the installation of the upper harness, which is also made of a small section beam or a thick board.
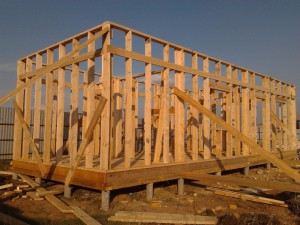
All vertical racks of the frame are temporarily unfastened by two side jibs, which are fastened with screws to the lower harness and to the vertical rack. For jibs use any boards or bars. You can even take long poles with which you can fix several racks at once.
Vertical elements of the frame are installed not only for the exterior walls, but also for the interior, while also designating future door and window openings.
After all vertical elements are exposed, make the upper harness. To do this, grooves under each rack are cut out in bars or boards. Therefore, it is necessary to observe maximum accuracy when marking and cutting grooves. The bar of the upper harness is attached to the vertical posts by metal corners or ordinary nails. To give greater rigidity to the frame, instead of temporary frames, permanent struts and struts are installed.
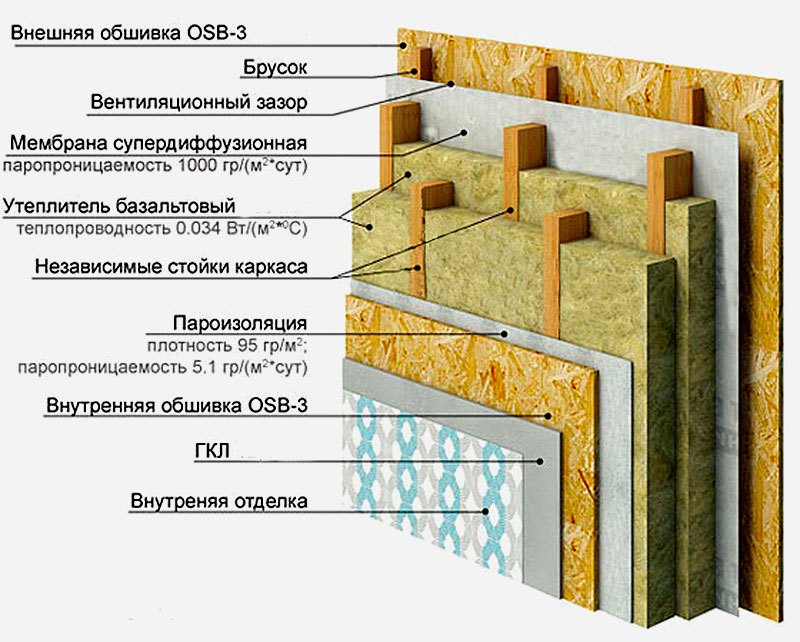
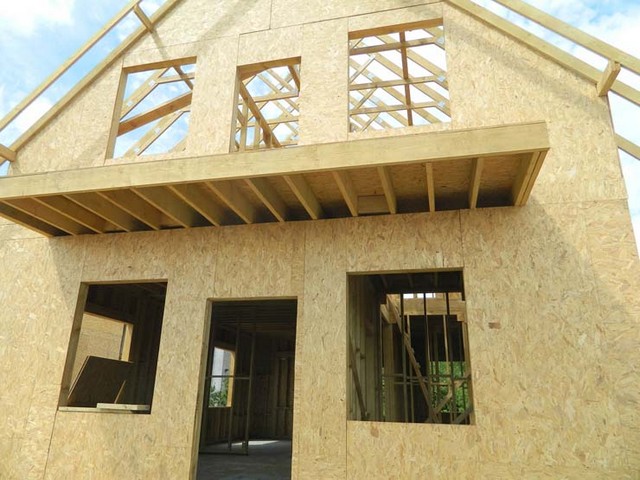
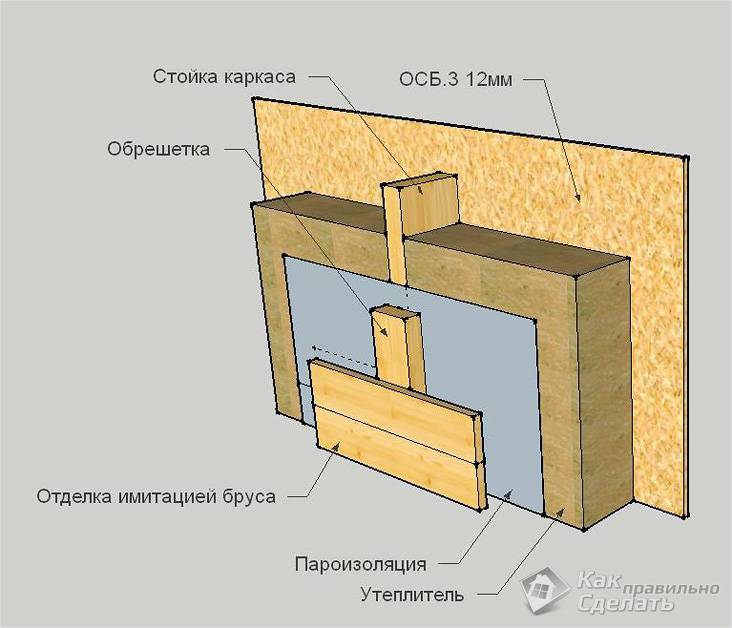
The walls can be ready-made factory shields with insulation inside or be made independently. In this case, boards are sewn onto the frame, steam and waterproofing is laid, a layer of insulation, again a layer of hydro and steam insulation, and all this is again sewn up with boards. It turns out that the frame elements remain inside the walls. This is a fairly simple method, but most often they use ready-made sandwich panels.
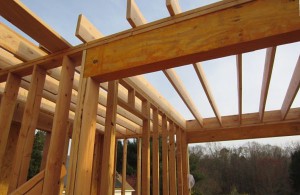
Installation of ceiling beams
The construction of ceiling beams is carried out using a beam, with a cross-sectional size of 15 × 15 cm. They are fixed above the vertical posts, so that all the load is transferred exactly to the posts, and not to the beam between them. Fastening is carried out using perforated steel brackets and corners, using the method of cutting grooves and nails.
During the construction of frame houses, all openings should be done immediately, that is, door and window frames need to be made so that after completion of work it is possible to insert doors and windows. If you decide to do it yourself, then view the photo or video so as not to violate the technology.
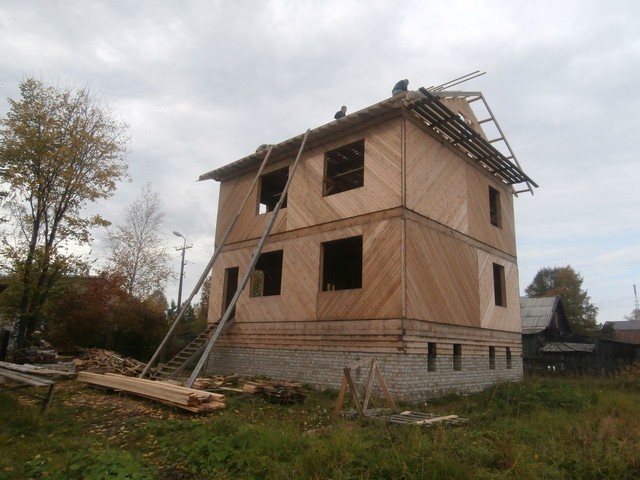
the rafters are fastened with the help of jibs. After all the rafters are installed, on their top ridge boards are nailed on both sides.
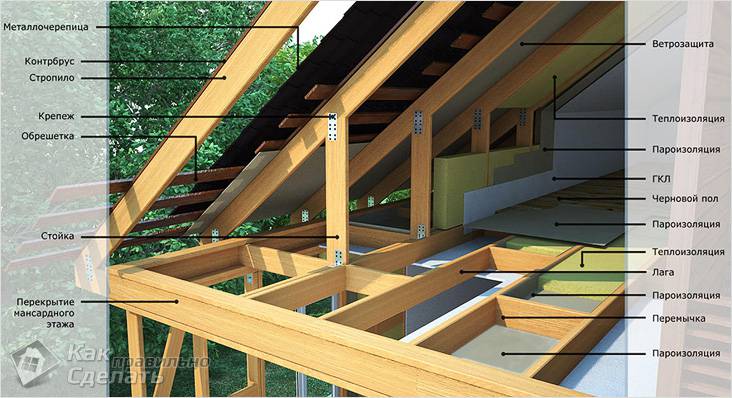
The next step is the roof lathing, the installation of thermal insulation, as well as the flooring of the roofing material, which is selected based on your own financial capabilities. Depending on the type of roofing material, the lathing is performed sparse or solid.
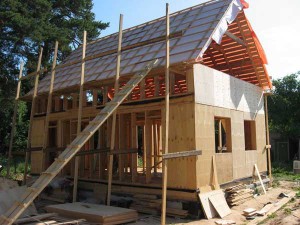
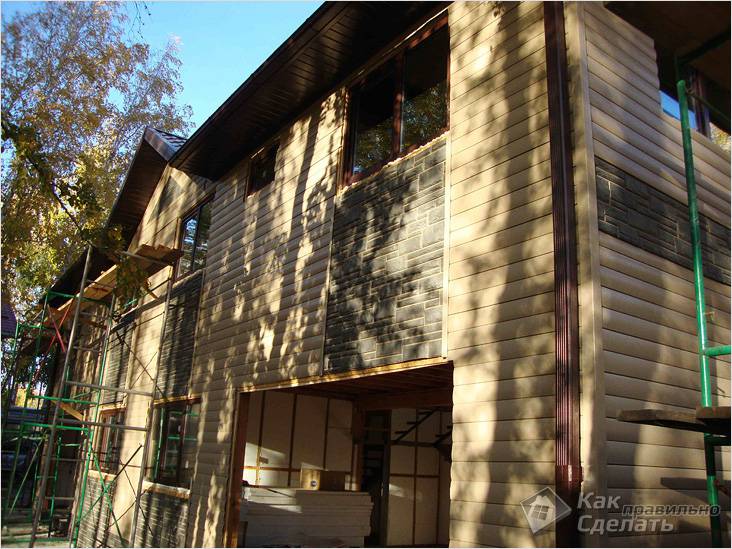
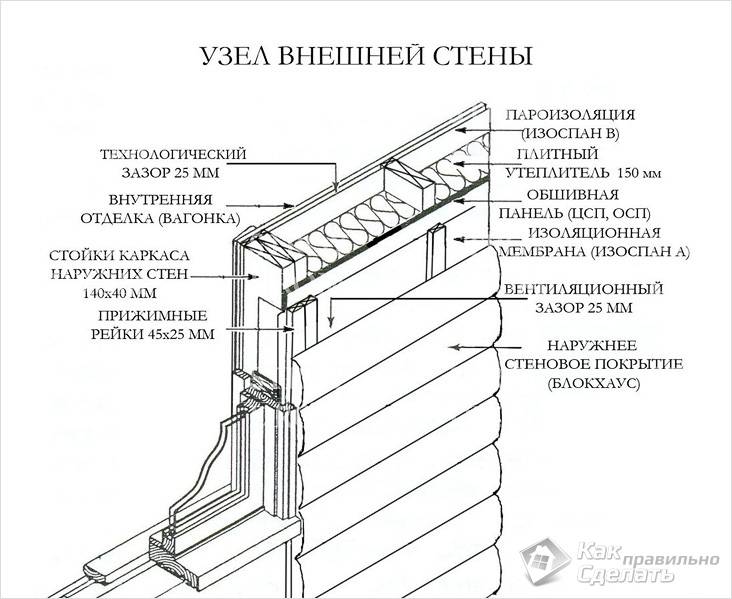
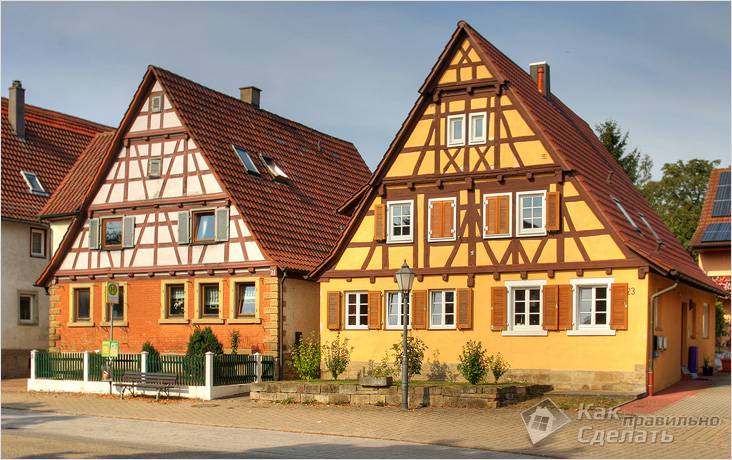
Outside, the frame house can be additionally insulated or simply finished with decorative material - vinyl or metal siding, plastered, lined with ceramic tiles or lined with lining. But in any case, a vapor and windproof membrane should be laid under the finish.
The construction of houses using frame technology is not only a quick, but also profitable process, especially if all building codes and rules are followed, with the involvement of professionals who are guided not only by photos, but also by their knowledge.
To build on your suburban area do-it-yourself frame house no need to attract heavy special equipment, while all work from filling the foundation to finishing work can be done in the shortest possible time.
Another important advantage of this construction technology is its relatively low cost when compared with houses built from other, more traditional materials.
The choice of frame house design
Today, several technologies are used for the construction of frame houses, among which the most common are:
- frame and frame
- frame and shield.
But in the event that the work is done by oneself, the first option is more rational, since for the construction of frame-panel houses it is necessary to use special equipment to carry out installation work.
Since if it is decided that we are building a frame house, then it is quite expected to receive a bonus in the form of a low cost of such a building, while it is quite comfortable and comfortable for the family to live both in the summer house in the summer season and year-round in a suburban village.
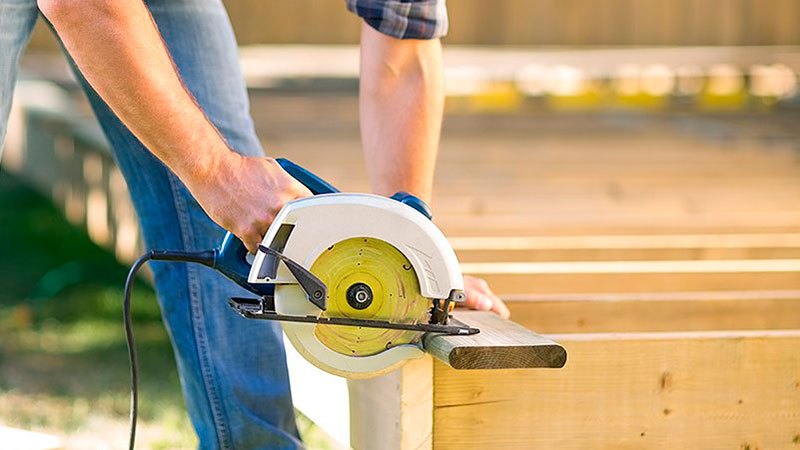
A tool to get before the start of construction
Before starting construction, for the high-quality implementation of all stages, it is necessary to prepare a tool designed for carpentry. Necessarily needed:
- jigsaw or power saw;
- hand saw;
- drill and screwdriver ( preference should be given to a professional instrument, as amateur versions simply can not withstand the load and quickly fail);
- several hammers of different types;
- nail clipper;
- large square;
- roulette;
- building level;
- chopping cord.
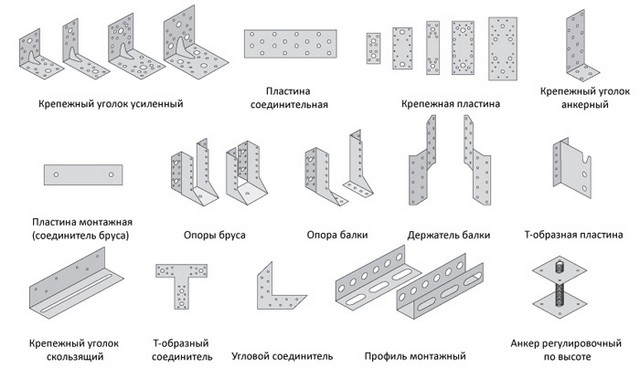
In addition, you will definitely need a large number of mounting materials:
- metal sealing corners;
- nails
- screws and screws;
- bolts and nuts;
- anchor connections.
![]()
Depending on what type of foundation is chosen for prefabricated housesYou may need different types of tools and supplies, including:
Do-it-yourself frame house, continued instructions on the video:
The construction of the foundation under the frame house
It should be noted - the construction technology of the frame house is being carried out in stages with the mandatory observance of all norms and time frames, which ensures reliability and structural strength.
Naturally, you need to start from the planning of the building plot, study of the geological situation and the construction of the foundation, which can be of almost any kind. But given that the weight of the building is small, you can significantly reduce the cost of construction and give preference, or, for example, arranged using special screw products.
A monolithic strip foundation, which is very popular with private developers, will be necessary provided that the basement is planned, otherwise, its rather high price, as well as the high complexity of the processes, are not profitable in this case.
But, it should be borne in mind that not only one's own desires and preferences should be guided when choosing the type of foundation for the house. It is necessary to take into account the geological situation on the site, the nature of the soil, as well as the level of groundwater.
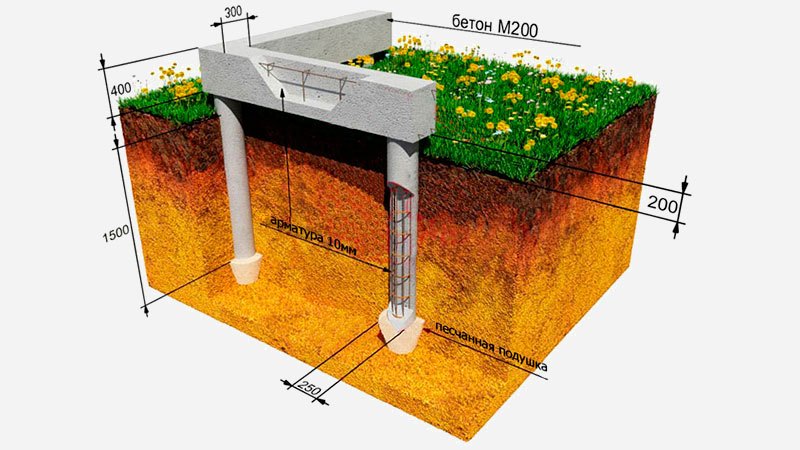
If we take for example a one-story frame house, then, ceteris paribus, the most optimal type of foundation for it would be column foundation.
Its construction is quite possible on its own and in the shortest possible time, primarily due to the fact that the amount of excavation is small. It is enough, in accordance with the calculations, to prepare wells of the appropriate diameter and to the required depth, taking into account the freezing of soil in the winter.
First, markings are made for future columns, taking into account the fact that they should be located under each intersection of the supporting structures, as well as with a step of 2-3 meters under the bearing walls, the length of which exceeds 5 meters.
Do-it-yourself wells for a pillar foundation for a frame house It is recommended to perform with an extension at the end, i.e. with a device heels, which will give it greater stability and strength.
And for protection against groundwater, it is recommended to run at the bottom sand and gravel pillow, a thickness of approximately 10–20 cm, which must be poured with a cement “milk”, a very liquid cement solution with a small filler content.
Since the depth of the columnar foundation can reach 1.5–2 meters, and sometimes more, to give structural rigidity and greater bearing capacity, it is recommended to install concrete before pouring reinforcing cage. But before that, especially if the soil is not very dense, it will be necessary to make the formwork: for removable it is often used metal, and for non-removable - asbestos pipe.
A week later, when the concrete gains about 70% strength, you can proceed to the device grillagewhich can be made in the form of a monolithic tape or from metal channels.
For the manufacture of concrete grillage, it will be necessary to install the formwork, inside which to mount the reinforcing frame from rods with a cross section of 12–16 mm and fill the concrete mix. After that, after one to two weeks, you can immediately begin to erect the walls of the future home.
If metal channels are used for the grillage, then these works can be started immediately. When pouring a monolithic grillage, special anchors should be installed with a step of 0.5–1 m, which will serve as a fastener for the supporting structure of the frame.
But, since one of advantages of frame construction it is possible to conduct work all year round, then if the foundation is being built in cold weather, you can give preference to the pile-screw version, the installation of which can be performed with the involvement of equipment or manually.
For grill device in this case, preference is given metal channels, but a concrete base is acceptable, the mixture for which should be made with the use of anti-frost additives, and in addition, conditions should be provided for its heating to prevent freezing of water.
It should be borne in mind that when installing the grillage, the layout of the house must be taken into account, since all the bearing walls will rest on it.
Frame house 6 on 6 one-story with an attic, video:
Communication gasket and sub flooring
Due to the design features of the frame house, the installation of communications should be taken care of even at the stage of construction of the foundation. As a rule, engineering networks are laid in the ground, arranging special recesses under them, which must be insulated and waterproofed. In this case, it is necessary to note and designate all communication connections, so that during their further installation there will be no confusion.
The next stage of work is floor device, which at the same time will be the basis of the rough floor of the first floor. The right choice is concrete screed, for the manufacture of which it is necessary to install the formwork and fill the layer of the solution with a thickness of about 10 cm.
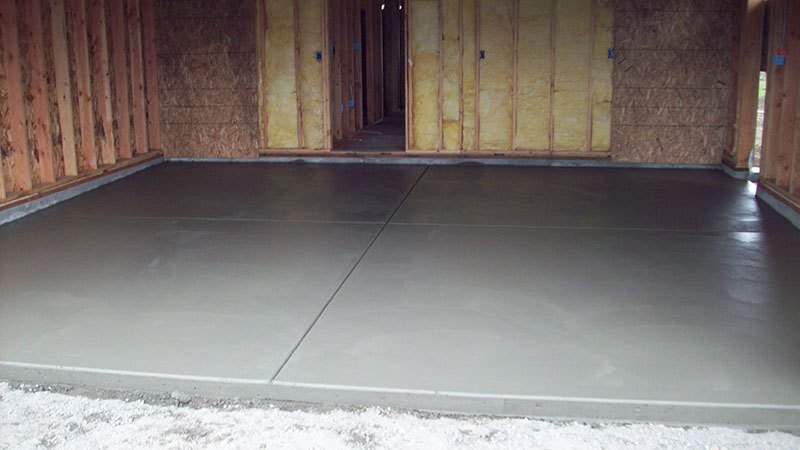
Be sure to lay a layer of thermal and waterproofing before pouring, for which you can use a regular roofing material, the material is quite reliable and inexpensive.
After the screed has gained the necessary strength, you can install the logs and lay the boards on them, which will become the basis for the flooring. This work can be done immediately after screeding, but better after, for example, a roof is installed on a one-story frame house with a flat roof.
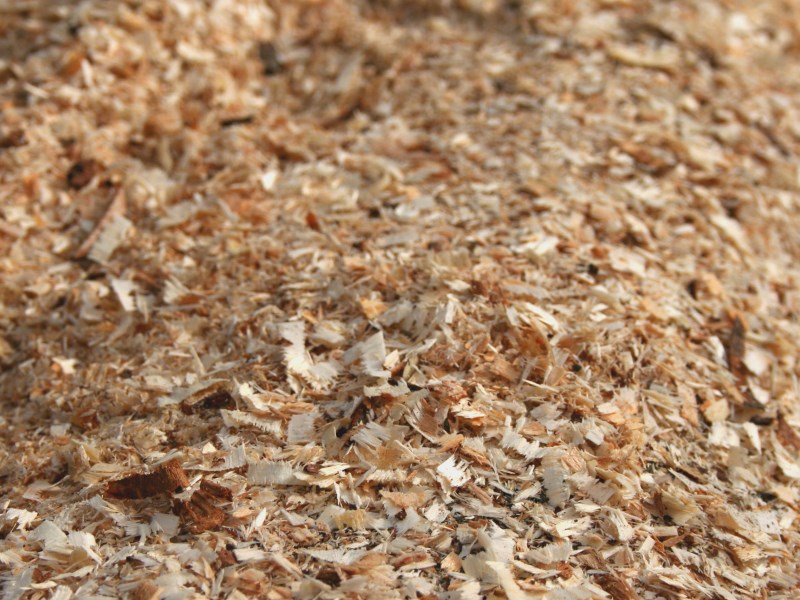
You should definitely think about why you can use thermal insulation materials based on mineral wool or polystyrene foam, although it is quite reasonable to arrange an insulating layer of expanded clay or wood shavings. Get involved in!
The technology of building a frame house in stages
For the manufacture of the frame of the house can be used as wooden beamso metal profiles. But it is necessary to consider the following facts. For example, the cost of wood material is lower, even if it is necessary to purchase processed timber with a moisture content of not higher than 12%, since otherwise, the structure due to shrinkage may skew.
It is easier to work with metal, in addition, this material has a large bearing capacity. But the real problem is the termination of compounds in which there is a danger of the formation of cold bridges, which, of course, will reduce the comfort of living and increase operating costs.
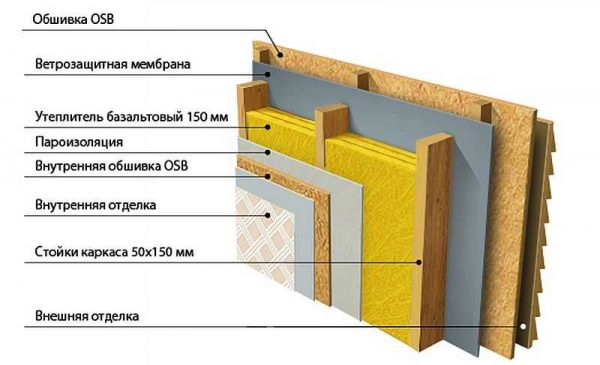
In general, issues of thermal insulation are fundamental in this type of construction. A worthy option is thermal insulation of the frame house with mineral wool - material with low thermal conductivity, high performance and durability.
Also, the advantage of choosing mineral wool can be considered a large selection of products for the isolation of various structural elements of the house, taking into account their features.
For casing, the most suitable material is oSB plate. But you can use multilayer plywood and even chipboard, although these materials are rarely used at present, since their operational characteristics are inferior to OSB ( oriented chipboard).
It is important to properly prepare the timber and material for wall sheathing and treat it with special antiseptic agents.
This is necessary not only to fight microorganisms, but also with small rodents, which can become a real disaster for such a house.
Based on these criteria, one should approach the choice of materials for thermal insulation - they should not be attractive to representatives of the fauna, this approach is also important if the floor is insulated in the frame house on piles, even though it does not have direct interfacing with the earth.
Building a frame house: step by step instructions
Before laying the strapping beam, the grillage should be checked with the help of the building level, and if unevenness is found, correct them.
After the floor beams are installed and if the second floor is not provided, the turn comes to install the roof structure for the roof, to which the crate will be attached.
Roofing and wall cladding
It should be noted that the warming of the frame house largely depends on the choice of window structures. It is recommended, depending on the climatic region, to choose at least on a two-chamber versionbut three-chamber, recommended for regions with persistent, but moderate cold, have much greater efficiency.
An important aspect in maintaining heat and creating comfortable conditions for year-round living is reliable and effective wind protection of the frame house, for the device of which it is recommended to use special membranes mounted as a separate layer inside the wall sheathing.
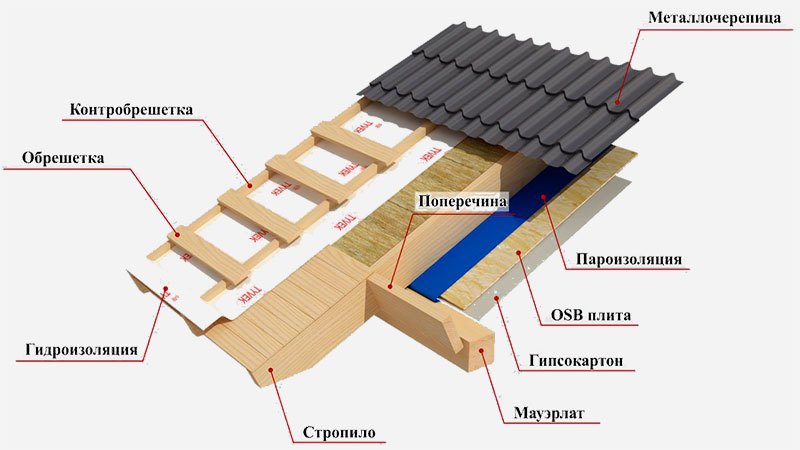
After the roof comes a turn of walls, the lining of which should be carried out simultaneously with the laying of insulation and steam, waterproofing layers. In addition, in the future, the walls of the frame house can be finished with any materials.
But if the question is, how to insulate a frame house for winter living, then the choice in favor is optimal.
For the design of the internal space are widely used drywall systemsallowing to embody any design projects in the interior of the room. For decorative finishing, the same materials can be used as for houses built from traditional materials.
The best heat insulator is:
So, spring is just around the corner, so it's time to think about starting the construction of your house. The easiest way is to build a frame house with your own hands, for which you do not need to hire additional special equipment, choose the weather suitable for work, or hire a brigade. Below you will learn how to build a frame house with your own hands, we will try to give the most detailed, step-by-step instructions. You can also estimate the cost of your future construction, before construction begins.
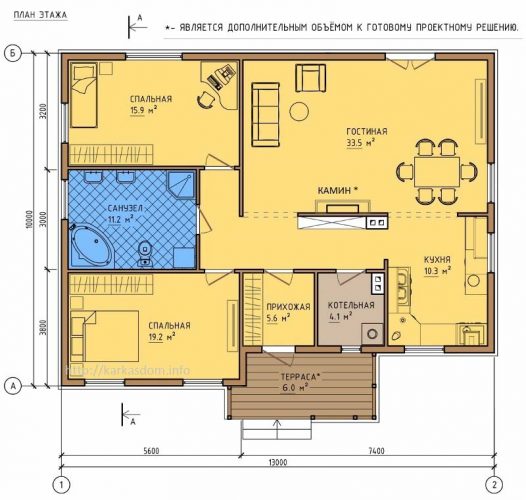
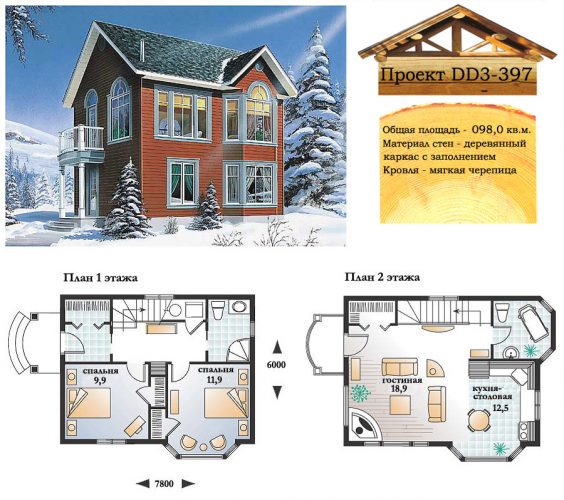
Project plan
The first thing that the preparation and construction of your home should begin with is a plan project. The drawing can be drawn independently, but can be ordered in special firms, which are quite a lot today. In order to save money, you can buy a finished project, or use free standard projects that can be downloaded on the Internet.
If you decide to draw a project yourself, think about whether you have enough knowledge and skills. As a rule, after sketching the sketch and floor plan, problems begin. If you know that you can draw in the project the wiring of pipes, electricity, indicate the locations of sockets, etc., then you can handle the independent drawings. If you have vague ideas about all this, it is better to turn to specialists with the sketches that you sketch at home. They will also help you find materials and even calculate the approximate cost of future construction.

House layout is offered on the Internet for free, use it for inspiration.
Do-it-yourself projects can be drawn for country houses that do not have complex communications and electricity wiring systems.
The project cost is from 500 rubles to 150 000 rubles. An average project will cost you around 5,000 rubles.
Stage one: preparation and foundation
The first step in the construction of a frame house is the preparation of the site and the installation of the foundation. For a residential house, the most often chosen is a strip foundation, although light wooden houses with suitable soils (sandy) for construction can be placed on a columnar. In addition, pile-screw foundations are gaining popularity over the past few years, however, due to the low quality of piles produced in our country, preference is still given to tape.
First of all, you should clear the area and remove the fertile soil layer. If possible, get rid of the differences. Next, we dig a trench under the formwork.
The depth of the trench should be at least 60 cm, that is, below the freezing point. If the depth is shallow, then due to the seasonal movement of soils, the foundation will rise and fall, which will provoke its earlier destruction. The width of the foundation should be at least 30 cm.
Formwork should be installed in the trench. The choice of formwork depends on your wallet, free time and the desire to take a hand in its creation. Those who wish to save money can assemble the formwork from old boards. Naturally, slots remain between the boards, into which liquid cement can penetrate during the pouring of the foundation. This problem can be solved with the help of a film, which forms the walls of the formwork.
To prevent the formwork from breaking during pouring (since heavy cement presses the walls with great force), spacers are installed. The reinforcement is laid in a trench prepared in this way.
At the same time, anchor bolts should be installed, on which boards or timber for the lower strapping will then be mounted. Anchor bolts can also be installed in an already completed foundation by drilling holes for them. However, this method is considered less reliable.
When all these manipulations are done, you can pour cement. It should not be too liquid, in consistency - like thick sour cream. Using a shovel, it evens out the surface, trying to keep the surface level of the future foundation even.
The foundation should solidify for several weeks. If at this time the rains begin, then the foundation should be covered with a film. Unfrozen cement is afraid of frost, so all these work should be done when the temperature does not drop below 0 degrees.
After 3 weeks, the formwork, if you used a removable, can be removed. Fixed formwork sold in stores should not be touched. They will perform the function of additional protection of the base under the house from external factors. But their cost is much higher than those that you can do with your own hands.
The cost of a self-built foundation with materials will be about 2-3 thousand dollars. Building a foundation from a specialist will cost at least 2 times more expensive.
A diagram of the various types of foundations is in ours.
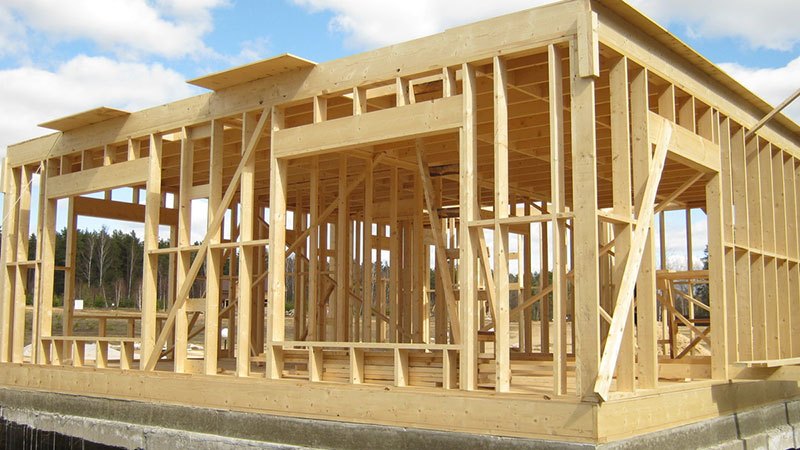
We are building a frame
Frame construction begins with strapping. You can make it from a bar or board. The harness is the first wooden layer that is laid on the foundation. The foundation must be waterproofed, since when the cement and wood come into contact, both materials are destroyed. The reason for this is considered different heat transfer. It turns out condensation, from which the wood rots and cement is destroyed.
On an isolated foundation (the cheapest way - roofing material), the strapping beam is first tried on. A beam is laid over the foundation and is firmly pressed in the region of the anchor bolts. You can use a hammer, but do not overdo it. Thus, an imprint from the bolt will appear on the beam. Here you need to drill a hole, and the beam can be mounted on bolts.
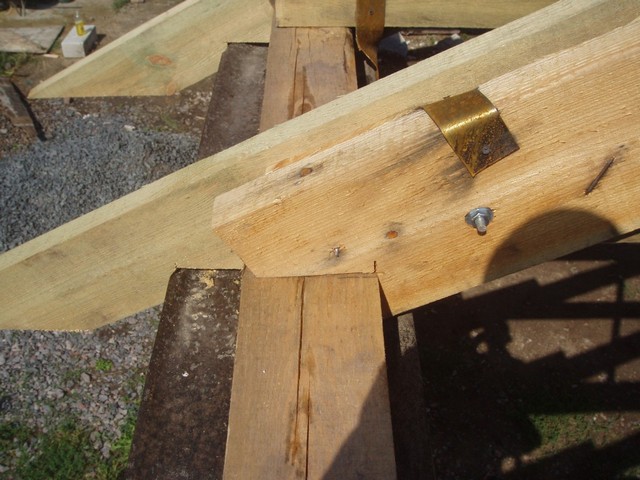
Pay particular attention to the corner hitch of the tie bar. Use metal angles, screws or nails. This connection must be reliable, so use a cut - so that one bar enters the other like a puzzle from Lego. The groove joint is considered the most reliable.
![]()
We begin to install the frame from the corners. Corner posts are an essential design element. At first, we support the racks on both sides with jibs. Later they will be supported by both the upper harness and the jumpers, but so far they can bend under their weight. Even fixing with corners will not always hold the rack. Installation of corner posts is quite a difficult process, so at least two people are needed.
When the corner posts are exposed, set the rest in between. We set them almost the same, periodically checking the geometry - the angles should be exactly 90 degrees. Between the racks we nail horizontal jumpers from the timber, they will not allow the racks to deviate to the side.
When the frame of all the walls is assembled, we lay on top the timber of the upper trim. He completes the work on the frame of the walls, combining the entire structure into one.
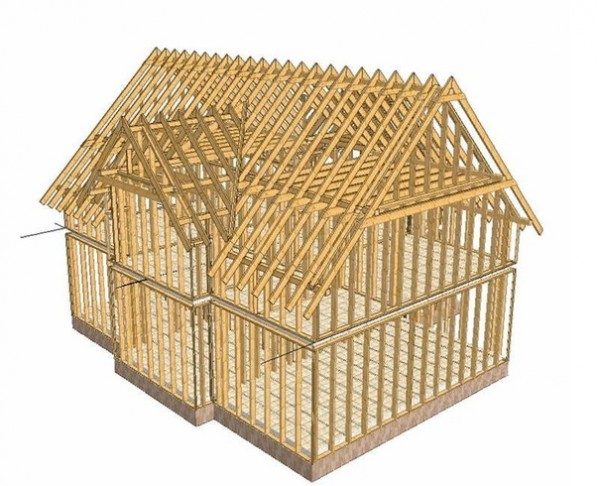
The roof frame, which includes the rafter system, is made in the same way.
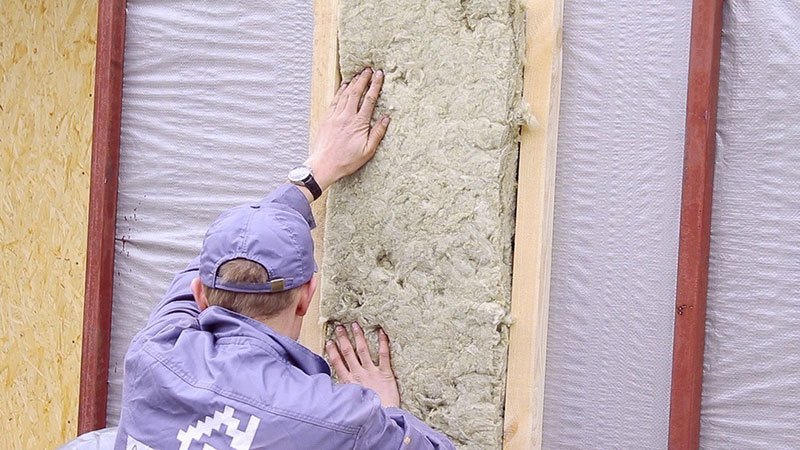
Wall formation: insulation, hydro and vapor barrier
In order to make the house as warm as possible, due to which the thermal characteristics of the house turn out to be much warmer than, say, from blocks. However, the quality of a frame building is influenced by many factors, including the quality of materials for walls, insulation, insulation materials.
What insulation material you did not choose, pay attention to the following factors:
- the insulation must firmly adjoin the beam, leaving no cracks.
- the insulation must be reliably protected by waterproofing film from the side of the street
- the insulation must comply with all safety principles and not emit harmful substances (Chinese materials sin this)
- the insulation must have a quality certificate and the necessary
To lay the insulation, remember: foam is laid from bottom to top, mineral wool with mats - from bottom to top, mineral wool with rolls - from top to bottom.
It is important to fasten the materials to the timber, especially for cotton wool, which eventually slides down and compacts without proper fixation.
When the insulation is installed, it must be protected from the outside with a waterproofing film. It should completely cover the entire wall, without tears, crevices, etc. And inside the wall, we also wrap it with a vapor barrier membrane. This membrane allows excess moisture to escape from the wall into the room, and prevents water from entering the wall from the outside.
The last layer of the wall is OSB plates or others. DSP boards are much better than purely wooden, but they also cost more.
The walls are assembled, and it remains to do the decoration.
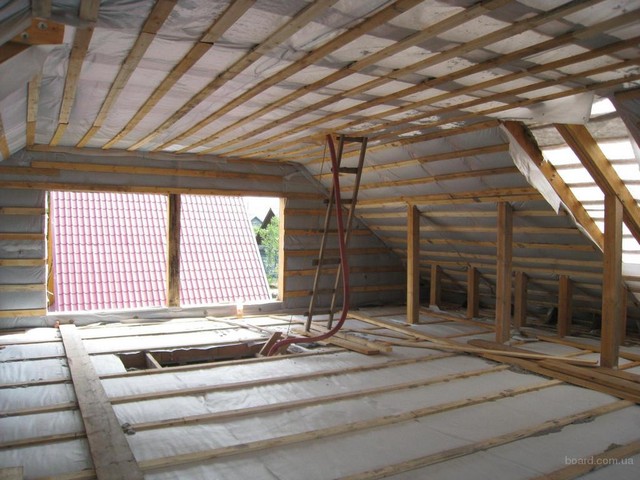
Roofing can also be done with your own hands. First displayed, and then the rafter system. The attic can be insulated, but this is not always necessary. At the cottage, it is better to leave the attic without insulation for storing the necessary things, drying fruits, etc.
The insulated attic or attic has a multilayer structure, exactly the same as the walls. Roofing material can be laid on plates immediately, if it is, for example, flexible tile. But most often it is necessary to carry out an additional crate.
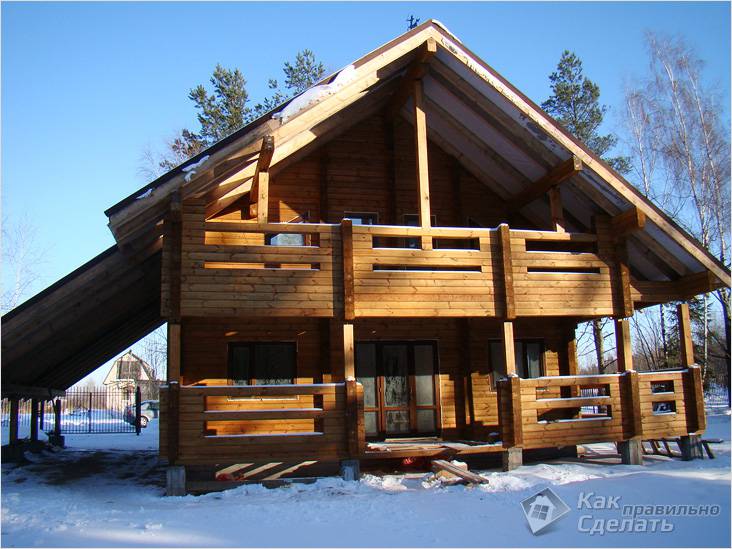
Despite some conservatism in the thinking of the population of our country in terms of construction (the use of heavy reliable stone and concrete materials), lightweight constructions are becoming more common. Houses made of SIP panels, wooden frame and frame-panel structures are gaining more and more popularity. The reason for this is significantly lower cost, as the required material, and its installation. In the article, we will consider the stages of building a frame house from the foundation to the roof.
The nuances of wood construction
The main difference between wooden structures from the "classic" stone, concrete, reinforced concrete and steel is a high fire hazard. The use of load-bearing wooden structures determines the fire hazard class of a structure not higher than III (class II is typical for stone and concrete).
Part of the problem is solved with flame retardants. These are special substances intended for the treatment of wooden structures in order to reduce flammability and combustibility groups. Neglect of such treatment can lead to the most sad consequences.
Another vulnerable place to build a frame house is exposure to biological destruction. It's about rotting and woodworms. To combat these factors, bioprotective compounds are used. Modern industry offers comprehensive fire-bioprotective agents that are most suitable for the protection of wooden structures.
Separately, we emphasize the importance of scrupulous fulfillment of all requirements for electrical installation. The most common cause of house fires is poor wiring, the use of non-certified electrical equipment (sockets, switches), violation of the rules for operating electrical appliances.
The indisputable advantages of wooden frame houses include their lower cost and speed of construction.
Foundation - the first stage of the construction of a frame house
A difficult issue in the framework of private construction was, is and will be the choice of the type of foundation. Wooden buildings are characterized by low weight. The foundation, as a rule, is also made "lightweight" in relation to the classic "stone" version of the house. Moreover, all types of foundations (strip, slab, pile) can be used for wooden houses.
The choice of the type of foundation for the frame house primarily depends on the engineering and geological conditions - soil strength, groundwater level, and so on. For the frame construction option, the use of columnar foundations is possible.
To save financial resources, you should order engineering and geological surveys in a minimum amount. At least one well about 5m deep. Based on the survey report, in consultation with a specialist, it will be possible to determine the best option for the foundation. An independent solution of this issue “by eye” with a high degree of probability will result in either an overspending of materials “in stock” or problems in operating a house installed on top of too weak a foundation.
Particular attention should be paid to the level of groundwater, their seasonal fluctuations, as well as the risk of the occurrence of a floodwater - the so-called “soil water”. Paying for surveys and consultations with a specialist will pay off handsomely.
Stage 2: the construction of the frame and the floor
The construction of the frame during the construction of a wooden house begins with the installation of the lower trim. The dimensions of its cross section will directly depend on the type of foundation. For piles installed with a large step (3m or more), the lower harness will be more powerful than for other options. The lower harness over the pile foundation is, in fact, a grillage. In all cases (including strip and slab foundations), this harness should be located above the ground mark. The lower harness should be antiseptic especially carefully. In addition, under its bottom should be waterproofed with dense polyethylene, roofing felt or other rolled insulating material.
There are two methods of erecting a frame: by collecting each element separately directly in the place of its design position, or by assembling the frame of an entire wall on a horizontal surface, then lifting it “on the bottom” and putting it in place. The second option is preferable, as it is more productive. It is especially convenient when the foundation option is in the form of an insulated Swedish plate - at the time of the assembly of the frame, the draft floor surface of the first floor (the top of the plate) is a convenient platform for collecting wall frames.
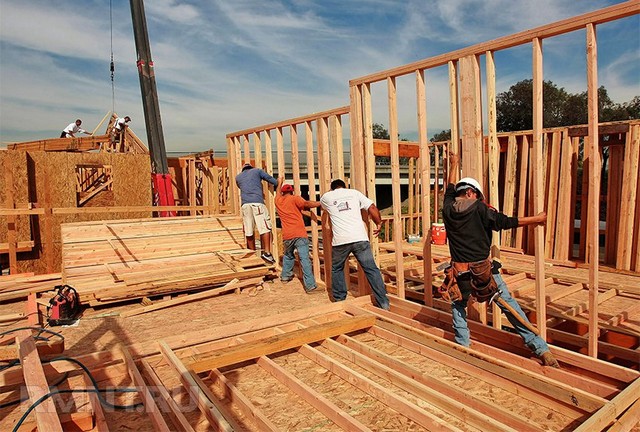
The spatial stability of the frame is provided either by shields (frame-shield scheme, which is characteristic, including for SIP-panels), or by a board slanted in the opposite direction. At the installation stage, temporary braces are often used that are installed on top of the frame. After sewing with shields or diagonal boards of one of the sides of the future wall, the temporary braces are removed.
As shields, as a rule, OSB (QSB) plates with a thickness of 12 mm are used. When sewing with a board, its thickness lies in the range of 18-25mm.
The pitch of the racks (columns) of the frame is often set equal to 60 cm, which in the case of the frame-shield scheme is puzzling. The OSB size of the slab is 125x250cm, as a result of which a step of 60cm makes it necessary to trim each shield 5cm in width or 10cm in length. In this case, a step of 62.5 cm will be a multiple of the width of such a sheet (2 steps) and the length (4 steps). With plank cladding, a multiplicity of 60 cm does not create problems.
The choice of paneling / board is usually based on the prices of these materials in the region of construction. At an equal price, preference should be given to the shield version, as a more technologically advanced and fast-built.
After the construction of the frame of the walls of the first floor and the device of the upper trim (belt), the installation of floor beams begins.
Reinforced concrete floors (both monolithic and prefabricated) in wooden houses are not used. Lightweight options like Terriva and the like are also better off. Wood has very different linear expansion exponents from other materials when the temperature drops. In addition, wood, as a "living" material, slightly changes its size and with differences in humidity. The combination of dissimilar materials in the supporting frame is highly undesirable.
Floor beams are usually made of 50x200mm boards or doubled 50x150mm boards. The second option is preferable if the boards are paired with a mirror image of annual rings - such a beam will be more stable. The spacing of the beams depends on the span to be covered, cross-sectional dimensions and loads. Usually this step lies within 60-100cm.
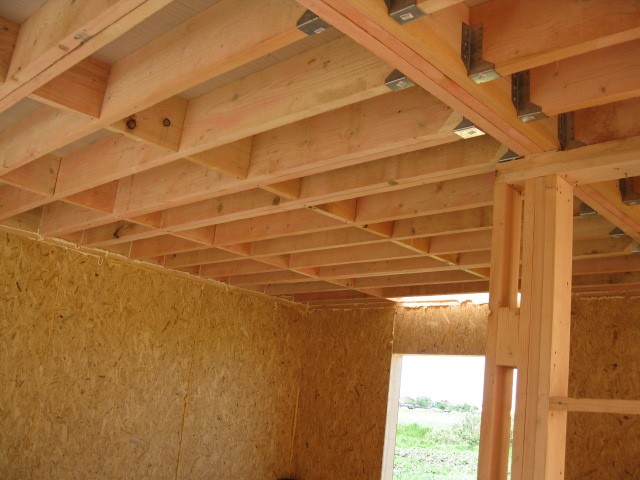
Before the construction of the frame of the next floor, it is necessary to lay the flooring on top of the floor beams. For this, tongue-and-groove floorboards or plate materials (OSB, plywood) are used in two layers. The joints of the second layer should not coincide with the joints of the first. If the floorboard is used until the construction is completed, it is protected from pollution and damage by sheets of fiberboard or thick cardboard.
Overlappings in wooden frame houses should be soundproofed. It is advisable to use finishing materials with vibration isolation. For example, a laminate coating laid on top of a cork wood substrate. Otherwise, the audibility will be very high, and the floor will be an analogue of the drum.
Stage 3: the roof
A good option for installing a roof for a frame house is its pitched version. The roof can be single-pitched, double-pitched, hip, etc. Any material can be used as a roofing layer - slate, corrugated board, metal tile, bitumen tile, etc.
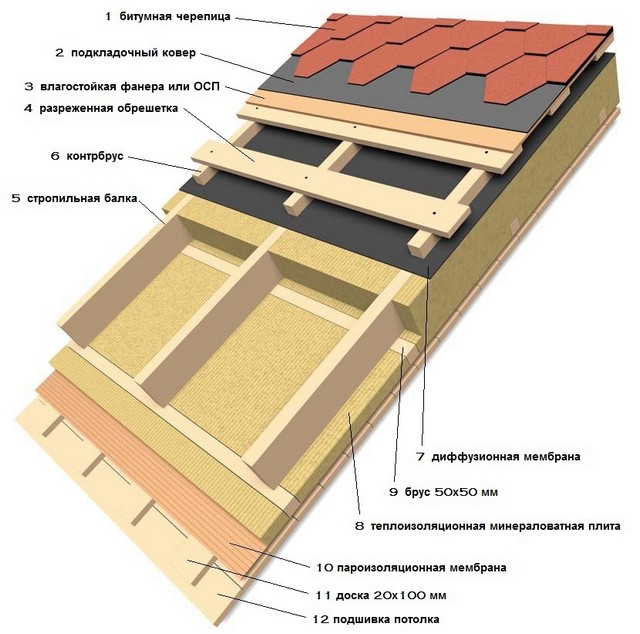
The roof slopes are formed by the rafter system. Rafters are most often performed from a board with a section of 50x150 or 50x200. The rafter pitch depends on snow loads in the region of construction, span, section. Usually the step leaves 80-120cm.
The rafter leg rests on the Mauerlat. In a frame wooden house, its function is performed by the upper binding of the last floor.
Stage 4: partitions, communications and interior decoration of the frame house
The best option for partitions in a wooden frame house is a frame made of wooden beams with a section of 50x100 mm, sheathed on both sides with the same OSB boards. The step of the racks for the partitions is identical to the supporting walls. The internal cavity of the partitions is filled with soundproofing material.
In rooms with a wet regime (bathroom), the floor and walls are additionally sheathed with magnesite plates, on top of which waterproofing is applied with coating materials. The use of magnesite plates makes it possible to clad walls and ceilings with ceramic tiles.
There are no obstacles to the installation of drywall partitions in frame wooden houses.
The laying of intra-house communications is carried out before the inner wall cladding. Electrical wiring is laid in special corrugated sleeves. Laying of water-carrying communications in the body of the ceiling is best avoided. The risers of such communications are usually passed into the cavity of the walls.
The best option for interior decoration of walls and ceiling is drywall. It is easy to fix it with self-tapping screws on wood with subsequent puttying. The finishing part can be anything from painting to wallpapering.
Fasteners
Fasteners in the construction of wooden houses are nails, building brackets and powerful self-tapping screws. It is better to refuse the use of black phosphated self-tapping screws "for drywall" in view of their fragility. The use of such fasteners when installing drywall partitions is permissible.
You can strengthen the connection of wooden elements with the help of steel corners, plates, plates, etc.
Stage 5: facade decoration
The most widely used for finishing facades of wooden frame houses are ventilated facade systems. For example, siding.
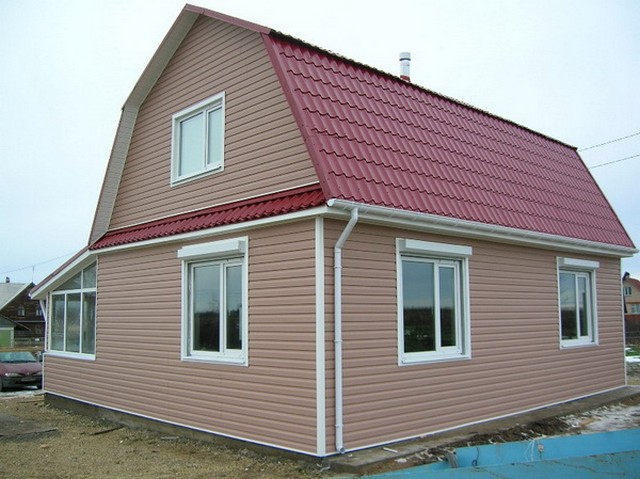
Any plastering options for wooden houses are unacceptable. Facing with decorative wooden bricks will also cause problems (with the exception, perhaps, of the basement, if no wooden structures were used within it).
Conclusion
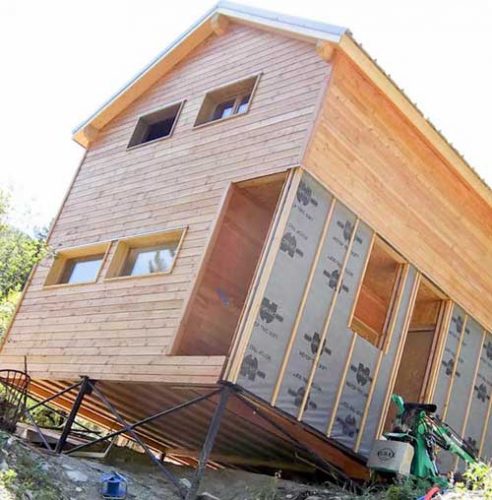
In order to avoid distortions of the supporting structures, it is required to strictly observe the stages of construction of a frame house. This is especially true of the elements of spatial rigidity - temporary braces and sheathing of the frame. It is highly undesirable to use thinner materials, especially shields. This construction technology does not tolerate deviations and amateur performances. It is impossible, for example, to replace OSB sheathing with sheets with chipboard, cement-sand, magnesite, and gypsum boards. Subject to the requirements given in this article, the service life of a wooden frame house will be at least 50 years.
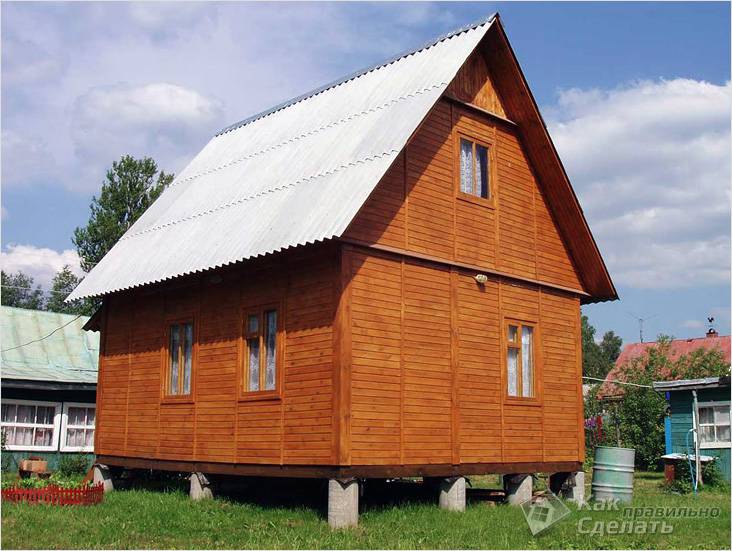
The frame house is light and very simple, it can be built in a short time. Such facilities are becoming increasingly popular. Buildings are erected in summer cottages for both seasonal and permanent residence. When constructing buildings using this technology, it is necessary to take into account only one detail - the period of residence.
Since frame houses are very light, a particularly powerful foundation will not be required here, you can install the following types:
- screw piles;
- posts
- shallow tape.
A lot when laying the foundation depends on the type of soil and the number of storeys of the structure. So, during the construction of a simple one-story house, you can completely dispense with the columnar, even on moody soil.
Columnar
- In order to build a small house for one average family on a columnar foundation, for the foundation you need to purchase about 120-150 columns.
- Using a conventional drill, recesses in the soil should be made with a diameter of 20 cm and a depth of about a meter. The distance between the holes is about 80 cm.
- Then asbestos-cement pipes (columns) are inserted into the holes. The space remaining next to the pipes must be tamped with rubble and sand.
- Through a funnel, cement mortar should be poured into the holes of the columns.
Having established such a foundation, one does not even have to wait until the solution solidifies in order to continue work.
Screw pile
On screw piles you can build a house without involving a team of workers. To install piles, on the contrary, it is desirable to use manual labor. This is due to the fact that this work allows you to screw piles strictly according to the level without deviations.
When screwing piles, one basic rule must be remembered: it is strictly forbidden to unscrew piles repeatedly. Even if one of them was installed incorrectly, it is better to simply leave it in the same position than to disturb the compacted soil.
Unscrewing piles is the main mistake of all beginners.
Step-by-step instruction
There are two technologies for the construction of frame houses: Finnish and Canadian. However, the very principles of the construction of such structures are the same.
Stages of construction:
After the frame is assembled and sheathed, and the roof is ready, we must proceed to the decorative decoration of the structure. The house can be finished with clapboard, siding or sandwich panels. When decorating the roof, make sure that it does not leak. Between the lags it is better to lay a layer of heat insulator and waterproofing material. For an external coating, such a modern material as metal tile is well suited.
Warming
Before warming the house, you need to choose the materials. Warming is carried out inside and out. Interior decoration is best done with mineral wool and drywall. If desired, you can use vinyl gypsum board inside, which not only preserves all the heat-insulating properties of this material, but also has excellent aesthetic characteristics. Thus, the master will simultaneously solve the problem with insulation and make decorative decoration of the room.
External insulation is carried out to the finish. It is also necessary to carry out thermal insulation.
- First, they make a crate at home. Between the battens of the battens, a layer of mineral wool is laid.
- Styrofoam is applied on top of the mineral wool.
- The gaps between the foam plates and the uprights are foamed with conventional mounting foam.
- Warming of the outer part of the frame can be carried out without the crate.
The inside is insulated in much the same way. It is necessary to lay the material between the racks of the house, and then additionally close it with foam.
Vapor barrier is a must in any room. Especially if it is a residential building in which there is a kitchen, bathroom and other places of high humidity. It is noted that in such rooms the moisture level can be even higher than in the open air.
The vapor barrier is often installed incorrectly.
- The main mistake is the use of home-made materials and polyethylene instead of factory vapor isolators. The vapor barrier film, despite its resemblance to polyethylene, has a special structure. It is multi-layered.
- Incorrect and poor installation of a vapor barrier. Sometimes builders during the installation of the membrane can tear it or damage the seams. It also often happens that the membrane does not adhere well to the walls.
- Installing a vapor barrier membrane on the outside of the house. Windproof layers are usually made outside. And the steam insulator must be mounted only from the inside. By the way, during installation, make sure that the membrane is installed on the right side.
The vapor barrier membrane is mounted on a heat insulating layer. The fact is that it is the heat insulator that most often harms condensate. Therefore, it must be protected. If the steam penetrates inside, then after about a couple of seasons, the owner of the house will find that the insulation has ceased to function. The moisture is to blame, which caused the appearance of cracks in this layer. If the defect is not eliminated, then it will only get worse. Soon the steam will reach the boards.
Typically, the wall thickness of a frame house is 70% composed of insulation. If the insulation layer is destroyed, the structure will fall apart very quickly.
When installing a vapor barrier, it must be remembered that the building must "breathe." It must have the natural movement of air masses.
Installation of polyethylene instead of special membranes destroys ventilation processes. This causes the destruction of the house. Dampness, mold and fungus begin to appear on the premises. Forced ventilation is unlikely to save the situation.
No material acts as destructively as polyethylene. It completely seals the room. Given that modern houses also have sealed double-glazed windows and double doors, one can imagine what kind of atmosphere will be in such a room.
A photo
Video
If you want to order a turnkey frame house construction, it is best to contact a trusted company (with good reviews).