In the construction of water supply and sewer networks, the construction of wells is the most crucial task. This is not only drinking, but also overflow, inspection and rotary wells, various septic tanks and sedimentation tanks.
Various materials are used for their construction: stone, wood, metal pipes, concrete, plastic. The laying of a well made of bricks, at the same time, deserves special attention for the simple reason that it is not difficult to do it yourself.
Moreover, if you use a used brick for this purpose, the price of a well will pleasantly surprise you.
Brick well device
Most often, well masonry made of bricks is used in the construction of network reservoirs. Depending on the purpose, they can have either round, or rectangular or square shape.
So:
- The laying of wells, the depth of which does not exceed six meters, is usually carried out from below. There is another way of erecting walls, called the lowering one - it is used in deeper mines.
Most often, it is drinking. - We will talk about the erection of masonry from the bottom up, and the video in this article will help you better understand the information. So, if we are talking, for example, about a viewing or rotary well, the laying of its walls should be done on a concrete base.
- It can be performed as a monolithic method, or arranged using reinforced concrete slabs. The size of the bottom should slightly exceed the area of \u200b\u200bthe well, taking into account the thickness of its walls.
- To start laying and to give the correct shape to the well, marking is applied to the base with ordinary chalk.
First you need to draw perpendicular axes: transverse and longitudinal. The point of intersection will be the center of the well. - If his shaft is square, you need to draw an internal perimeter. For a well with a circular configuration, mark the inner circumference of the walls on the base.
- The walls of any structure built of brick require additional reinforcement, and wells are no exception. Only amplification methods in each case use different ones.
Anticipating your question: “What is laid at the bottom of the well before laying the first row?”, We’ll immediately say that in the case of round wells, this is a wooden or metal frame. - In general, over the entire height of the brickwork, three frames of the corresponding diameter are installed. The lower or main frame is the widest; it is 50 mm larger in diameter than the intermediate and upper frames.
By the way, this frame can also be made of reinforced concrete. The thickness of the lower frame must be at least 10 cm. A steel knife is installed on the outside of this frame. - To increase the strength of the masonry, the frames are interconnected by metal rods with a diameter of 12-15 mm. According to the size of their cross-section, holes are drilled in the frame.
Six rods are inserted into the lower frame. An intermediate frame is installed on top. To it, to connect to the upper frame, also fittings are mounted, but not six, but twelve rods.

- The fittings must be threaded, as their fastening to the frames will be carried out using nuts. The resulting frame will ensure rigidity of the entire structure, and will not allow the walls of the well to collapse, even if there is a natural movement of the soil.
- When constructing a well in the lowering way, the lower frame with a knife will allow to lower well sections into the shaft without problems. Only in this case there can be not three frames, but much more - it all depends on the depth of the structure.
- The main task that needs to be solved before starting the construction of walls is the absence. If moisture seeps into the shaft, it is pumped out.
Naturally, during the rain, such work is also not carried out - the water is washing out the solution that has not yet been seized from the seams. - For those who have never before been engaged in masonry work, the easiest way to make a guide is to make a template that mimics the section of the walls of the well. After installing the frame, a brick is laid out along the outer edges.
The photo below clearly shows how to do this. The walls of the round well are laid out in such a way that the row of bricks forms its inner circumference.

- Then you can start mixing the solution. The component composition of the mortar is a mixture of one part of cement and three parts of sifted sand.
There should be enough water in the solution to get a thick, elastic solution. - Under the first row, it is placed directly on the frame. If it is concrete or wooden, it is better to cover it with strips of roofing material in advance.
- Vertical joints that diverge significantly from the outside of the masonry are carefully filled with mortar. With the construction of a large-diameter well, the expansion of the joints between the bricks can be quite significant.
- In order to save mortar, as well as to increase the strength of the joints, fragments of brick, large gravel, or expanded clay are laid in them. To do this it was convenient, there should be a gap of at least 20 cm between the walls of the shaft and the well.
Then it is covered with layers of sand and gravel, and in the upper part with clay, which is carefully rammed. - Depending on the depth of the well, the thickness of its walls can correspond to one brick length (25 cm), or laid out in one and a half bricks (37.5 cm). The neck of the well, having a circular shape, should be slightly narrower than the diameter of its working chamber.

- For this, the masonry is gradually narrowed, but only on three sides. On the steep side, projections are usually constructed, or metal brackets are installed that allow descending into the well.
The verticality of the wall must be controlled using a plumb line. The ligation of adjacent rows is carried out due to a small displacement (a quarter of a brick). - The two lower rows will be poked, and further, they can alternate with spoon ones, every three or four rows. Alternating rows will serve as a guide for additional reinforcement.
In every fourth row, it is necessary to lay a steel wire or a thin strip. - To enter the pipes into the well, holes must be left along the masonry. Where the rods of the frame will interfere with the laying of a brick, it will have to be cut down.
Slightly not reaching the level of the intermediate frame, the laying is stopped. First you need to install the frame. - An intermediate frame is put on the free ends of the rods and then firmly fixed with washers and nuts. After its installation, as well as checking the horizontality and verticality of the entire structure, masonry work can continue.
The joints between the masonry and the frame must be carefully sealed with mortar.
As the height of the masonry increases, for the person who produces it, scaffolds must be installed inside the well. Having completed several rows, it is advisable to plaster the cement immediately from the outside.
A layer of plaster will increase the service life of the well, and protect it from the penetration of groundwater or water hoses.
Well masonry for house walls
In low-rise construction of residential buildings, well masonry of brick walls is often performed. This type of masonry deserves the closest attention.
Firstly, it allows you to most effectively insulate the walls. And secondly, in the process of construction they can not only be insulated, but also decorated at the same time. So, well masonry: the pros and cons.

So:
- A little more about the positive aspects of such walling. For each region, there are certain standards for the recommended wall thickness, which can be very significant.
- In order to save money, given the ever-increasing cost of energy, the walls, in theory, need to be made even thicker. And this is economically irrational: the cost of buying a brick will increase, and the foundation will need a more powerful one.
- For those who are building a small private house, such difficulties are useless. To get warmer brick walls with the lowest financial costs will help the masonry with expanded clay.

- You can, of course, use roll insulation, but then the cost of construction will increase. Perhaps, only polystyrene chips and expanded vermiculite can become a good alternative to expanded clay.
Granular heaters fall asleep in the "well" of the wall, formed in the process of its construction. - This design significantly reduces the load on the foundation from the weight of the walls. And if you use hollow bricks for their construction, the outer walls will become another quarter easier.
Brick laying with a well has only one minus: it is not monolithic, since it has voids. For this reason, a building with similar walls has reduced capital and seismic resistance. - In fact, the masonry is a three-layer structure consisting of a main wall, insulation, and a front wall. Both walls during the laying process are firmly bonded to each other.
To strengthen the structure, various techniques are used, for example: the main wall is built of solid brick, and the front wall is made of hollow.

- The inner space of the first two rows can be filled not with a heater, but with a solution, representing a monolithic belt. In horizontal seams, after 4-5 rows, reinforcement with a steel mesh or strip is performed.
- Due to the horizontal and vertical dressing of the seams, and wells are obtained, closed on all sides. If bulk materials are used as insulation, then in order to avoid their shrinkage, horizontal diaphragms are made of bump rows of bricks every 50-60 cm.

Currently, at least four options for the implementation of well masonry are used: lightweight (half-brick), one and a half bricks, two bricks (sometimes two and a half), modified.
We will not describe the details of these methods. If necessary, you can easily find the information you need on the Internet
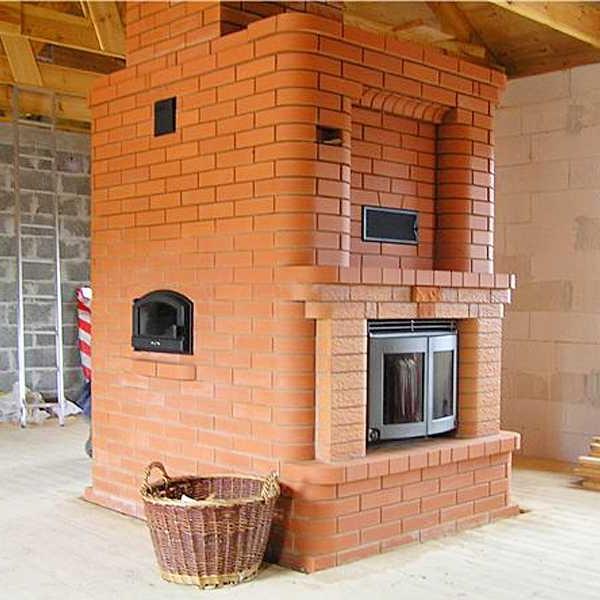
Masonry stoves
Similarly, the laying of furnace wells is carried out, the scheme of which is very similar to some methods of well laying of the walls of the house. In furnace construction, this type of masonry is used to reduce the thermal conductivity of the walls.
So:
- The well formed between the inner and outer walls, as in the case of the outer walls, is filled with insulation. In addition to the materials that we mentioned in the previous chapter, various types of mineral watts can be used here. Wells can be filled with some lightweight concrete.

We have given you a diagram with which you can do the laying of the wells of the furnace with your own hands. By the way, this method is used not only for laying the furnace itself, but also for the construction of the chimney.
An example of a heating - cooking stove device. Such stoves are successfully used in the Danube East in the construction of individual residential buildings. If the house is small (up to 60 m2), then only the stove is enough to heat it, if more, then they arrange water heating, the boiler of which is mounted in the stove. We’ll immediately clarify how to say: lay or lay down the stove? It would seem that the laying of the word and lay the stove. However, I adhere to the fact that it’s more correct to say go to bed and that’s why.
The figure shows the parts of the brick: 1. bonded face; 2. top bed; 3. ribs (whiskers); 4. spoon face.

And laying in half a brick, and usually laying the stove, is called laying with a spoon .. And we lay the brick on top of each other, which is more combined with the word to lay, lay, but not put in any way.
The very name of our stove (heating - cooking) says that it will have a hearth (a firebox with a stove for cooking) and a heating shield (heater). And the third mandatory part will be the pipe. In this case, mounted, because it is mounted directly on the furnace, it is mounted on it. There are also radical or remote ones that are separated from the furnace and connected to the furnace by a horizontal “sunbed” or “hog”. The location of the heater may be different, but during the construction of a house where water heating is not planned, it is advisable to arrange the furnace so that some part of the heater goes into each room. See the photo below.
For waterproofing on the foundation (guardian), lay out the base of the future furnace. The sides of the furnace are correlated with internal walls and partitions. The base is laid out in two rows. It will be common for both the furnace and the heater. On the third row we form chimneys and a furnace. Why are these two parts of the furnace not interconnected? Because for the long life of the furnace you have to shift the furnace 2-3 times. The size of the furnace, in addition to see, is also measured in bricks. The size of our furnace is 4x5 bricks. Indent from wooden structures to brick. They (indents) are also called the "cold quarter". The length of the brick is 25 cm, and this is the fourth part of the meter.
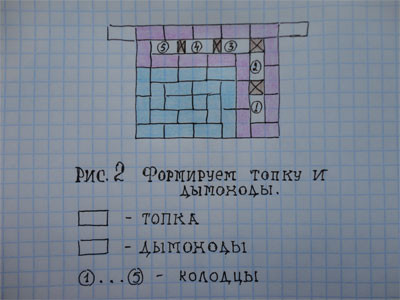
Now a little about how to navigate the location of the wells. As can be seen from the drawing, the furnace heater has a long and short side. When installing a nozzle pipe (as in our case), a ceiling cut is formed (fluff). When the size of the chimneys in a brick (12x25 cm.), Its size should be 90x100 cm. The central place for the device of the furnace, as usual, coincides with the presence in it of a capital wall on which the ceiling beams lie. When installing a furnace cutting, it is impossible to cut it, for obvious reasons. And if the output well goes exactly there? What to do? You just need to provide for this when installing chimneys and move the chimneys with a horizontal well ("deckchair", "hog") so that the last well falls into the place where you can make a cut without problems. You can translate both the upper and lower "hog". Which is better? I always do the bottom. Why? The lower hog begins immediately after the furnace and the air there is the hottest. It runs along the bottom of the entire heater and heats it more strongly. Heat, as I said, rises up the heater, providing uniform heating. For the same reason, I prefer horizontal wells. But they, I think, are appropriate to do with a small length of the heater. The translation of wells is very important to understand, then you will not be like "zombies" tied to orders and drawings. Remember that there are no identical ovens. Learn to think, understand where to send smoke, so that it is easier to move. In the figure, the wells are divided by partitions. This I showed how to divide the heater into chimneys so that they are of the same section. But to begin to lay them down from the foundation is not necessary. Look at fig. 3 and imagine the movement of smoke.

The rising and falling wells are connected by “passes” or “dives”. Top and bottom. If the upper “diving” can be a section into the chimney, then the lower one needs to be done 1.5 times more. Why? Yes, because small (unburned) smoke particles (soot) are heavier than air and will fall down, accumulate and gradually narrow the lumen of the lower "diving", which will lead to a deterioration in stove draft. In fig. Figure 4 shows how the output well can be translated by means of a lower hog device.

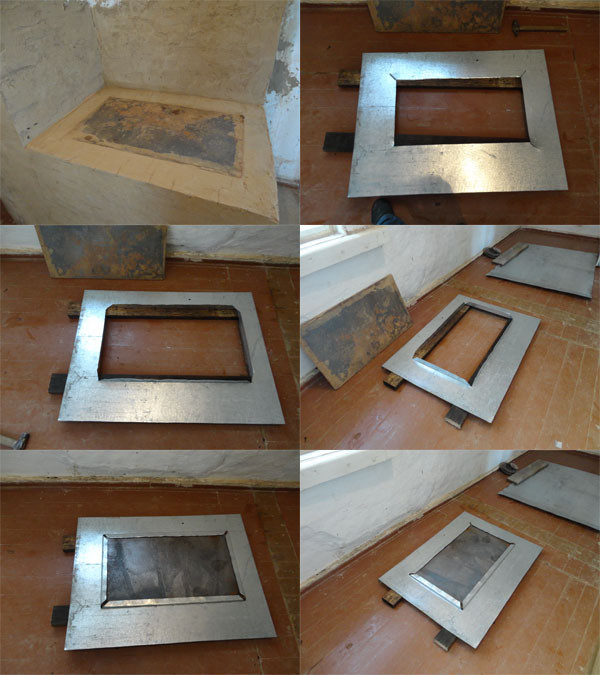
When you divide the heater into chimneys and try to make them the same (which is important), different thicknesses of the partitions can turn out. A quarter or half a brick. This is not scary. If with the device of partitions that begin from below everything is clear (they rest on the base), then with the device of partitions above the lower diving it is more difficult. They need to create a support. The support should be a brick released from the masonry of the heater, and then, a partition is already arranged on it. By this principle, the entire heater is laid out. Chimney overlap is made in two rows of brick inlet on one side and on the other. Fire protection dimensions must also be maintained above the heater ceiling to wooden structures. In the heater, the clearance of the outlet well is visible from above. Here the furnace valve will be installed and the pipe will start.
We select a furnace valve so that it as much as possible matches the cross section of the chimney. Cast iron valves are better than alloy valves.
Ceiling cutting, from experience I know, the most time-consuming part of the furnace. Work requires accuracy so that the edges of the puffs are the same, even and horizontal. The difficulty is that all this is done from above. While you have little experience and in order to achieve this, you will have to go downstairs more often and control the work, or let someone tell you. How I determine when to start making “teeth” on a butcher. When the distance to the bottom of the ceiling from the edge of the folded pipe remains in a brick. Then the fifth "inlet" will be flush with the ceiling. Above the fifth row, you must complete the formation of the cut. Its size will be 3.5x4 bricks or 90x100 cm. The upper edge of the groove should be laid out above the ceiling beams on 2 rows of bricks, plastered with cement mortar, as, indeed, the whole pipe.

After completing the cutting device, lay out the pipe riser. The riser passes through the roof and then forms the so-called otter, which hangs 100 mm above the roof. on all four sides. This overhang provides drainage of atmospheric water to the roof. If this is not done, then the water will drain down the riser, destroying it and moistening the attic space. Next are the head and head of the pipe. The cap is crowned with a cap, which prevents precipitation from entering the pipe and improves stove draft.
We have not yet considered the necessary element of a cooking stove - a firebox with a stove. I deliberately combined the explanation for the design of the furnace with the materials for the sheathing of the furnace tin. I hope that from these photos you will understand the firebox device and how to sheathe the stove. I assure you that if you do everything carefully, your stove will have a very attractive look and it will cost you quite inexpensively.

We spread the firebox. Immediately prepare the walls for the skin. We pay special attention to the protruding corner of the furnace. It should be vertical. The furnace and underfloor doors must recede from the masonry so that tin can be launched behind their “shoulder”. In addition, the edges of the doors should be in the same vertical line.

We mark and cook the tin under the stove. To do this, put a slightly larger sheet of tin on the stove, as shown in the photo. Mark the same distance from the walls of the heater and mark on the sheet. The future "shoulder" will be 2.5-3 cm. We cut out a corner of tin at the crosshairs of the lines and bend the "shoulders" at a right angle. We lay the blank on the stove. Curved edges should fit snugly against the walls of the heater.

Now we need to give marks on the slab corners on the lower surface of our workpiece. After that, we lay the inverted workpiece on the bars and lay the plate on the workpiece with the smooth side (the side on which it is boiled) so that the corners of the plate coincide with our marks. Draw a plate around. Next, remove the plate and step back inward from the lines by 3-3.5 cm. Draw additional lines and cut out the resulting rectangle.
Now we transfer the upper point of the laying of the furnace to the outer surface of the skin and mark the level of the bend of the sheet by level. We bend the tin with pliers, after cutting the tin along the edges of the heater and make a lock around the edge.

Then it remains to cut and nail the upper girdle. Size it is chosen arbitrarily. Whoever likes it. It is also formed in two parts and docked at the corner of the heater. Here, perhaps, is the entire course of the skin. I think that everyone can do such a job. The main marking accuracy and accuracy. On the floor, tin is pressed against baseboards. And a little secret, or rather advice. Before nailing the tin, mark the seams on some slat or fasten the tin with screws with wide caps, pre-drilling holes with a drill into the brick body.

After covering, “grind” the stove with cement mortar, whiten it, wipe it with oil, beat the baseboard and the flooded sheet, and the stove will take on the form as in the first picture. Try it and it will work out.
The stove in the house is not only a stylish antique interior, but also comfort, warmth. Dishes cooked in a Russian oven are extremely tasty and healthy. The installation of the furnace does not tolerate fussiness, the masonry is carried out slowly, carefully measuring the proportions of the wells, observing the dimensions of the seams. The slightest mistake - and instead of a furnace with good traction, you get a smoking "monster".Ovens come in different types and configurations, the most economical and functional is a kitchen stove with a hob (cast iron stove). The stove can be simple, but can have a complex structure with wood burning, stoves, and an oven. Recently, combined fireplace stoves have become popular.
Before proceeding with the laying of the furnace, it is necessary to prepare a foundation for it, that is, a foundation of concrete mix. To do this, dig a hole 50 cm deep, compact it well and fill it with concrete. The upper level of the foundation is removed a few centimeters above the floor surface.
While the foundation is drying, you can prepare the workplace - on both sides of the masonry, lay the brick and, so that they are at hand, knead the clay solution. The waterproofing is laid on the foundation and the first row, the so-called strapping, is laid out.
Mounting a stove with a stove
Masonry is carried out in one brick, with obligatory dressing, on clay mortar. The stoves are made of red solid brick. Initially lay out the blower, install the grate. Having laid another row, they put the fuel door, it is fixed with a wire, the ends of which are walled in masonry. Spread the firebox with a special refractory brick 30–35 cm high and cover it with a cast-iron stove.Behind the rear wall of the firebox, a chimney is laid out, which has several wells and goes to the ceiling. Smoke wells should be at least three, usually make one horizontal and two vertical. If possible, the internal surfaces of the chimneys should be made smooth so that nothing impedes the passage of smoke.
The furnace is a complex engineering structure, during its installation it is necessary to use a level and a plumb line, horizontal and vertical lines must be strictly perpendicular to each other, all planes are aligned and not deviate. Brick before masonry must be soaked. Therefore, after completion of work, the oven is dried.
To appreciate the rare evenings when you manage to be alone at home, you should sit with the electric light off for about fireplace in a comfortable chair. The measured crack of burning firewood, the gleaming flames of fun, a pleasant twilight: all this pacifies. To use the heat fireplace, a city dweller just needs to buy it. But rural residents prefer to stack a fireplace with their own hands. Not all, of course, but many.
Instruction manual
For masonry, both ordinary red brick and refractory are used. Before starting work, spread on top of the foundation fireplace a couple of layers of waterproofing (required). So you prevent moisture from entering the masonry. You can use roofing paper or roofing material for these purposes.
A clay solution is best kneaded for a couple of days before the start of masonry. First, dilute the clay in a special container. As it thickens, add water and mix.
Lay out the brick in size and set aside all non-standard pieces. Now do the masonry itself: lay on the edge the basement row of your future fireplace on cement mortar (for strength).
Before laying, moisten the brick in water, holding it there for 4-5 seconds. Wet brick absorbs moisture and mortar in much smaller quantities than dry. The seam in this case is quite thin, and the masonry becomes stronger. Do not forget about the dressing of stitches. When the seam of the brick is overlapped by the middle of the superior, a very good dressing is obtained.
For masonry fireplace use a mixture of cement, sand and clay, with a small mass fraction of cement. Cement is suitable for ordinary masonry grade 150. First, prepare a dry sand-cement mixture (part of cement for 8-9 parts of sand). Mix the dry mixture well, fill the clay solution into it and mix until a homogeneous composition is obtained.
Masonry stitches fireplace should not be too thick. Enough and 4-5 mm. Otherwise, over time, the solution from these places will begin to crumble. When installing a light fireplace directly on the floor, first perform a pillow or a platform of brick, laid out in three rows. Spread the first row on the felt, saturated with clay mortar and covered with a roofing article.
Related videos
Helpful advice
Constantly monitor the horizontal and vertical rows when plumbing, using a plumb line and level.
If there is no gas supply in the house, the usual stove made of red refractory brick comes to the first place for heating and cooking. It is heated both by coal and firewood. There are many of its designs for a wide variety of premises. For installation, it is better to invite the master stove-maker, you can also fold the stove yourself. Do not despair if you fail to do this the first time.

You will need
- - ordinary brick - 130 pcs.,
- - ordinary clay - 60 kg,
- - sand - 34 kg,
- - cast iron stove 762x456 mm - 1,
- - oven 320x270x400 mm - 1,
- - doors: blowing 220x160 mm - 1, furnace 220x160 mm - 1, cleaning 130x140 mm - 1,
- - grate 250x180 mm - 1,
- - gate valve 130x130 mm - 1,
- - corner for strapping 30x30x4 mm - 3.5 m,
- - roofing steel - 2 square meters. meters
- - felt - 1.5 square meters. meters
- - steel tape 25x15 mm - 1.2 m.
Instruction manual
Put on the floor two layers of felt, previously soaked in a clay solution, or a sheet of asbestos and cover with roofing steel. Place the stove not directly on the floor, but lift it onto the trenches - brick columns-walls with a height of 14 cm, this will protect the floor from heating. First and second row: trench masonry. It should be slightly smaller than the size of the furnace: 10 cm in length and 5 cm in width.
Lay the main masonry in the third row: 94x55 cm. On the fourth row, put one brick from the back of the slab onto a cone. This will expand the outlet channel, which fits the pipe or heating plate.
Install the blower and cleaning doors in the fifth row, resting them on the fourth row of masonry. Perform the back wall in a quarter of a brick. At a distance of 180 mm from the left side of the furnace, lay the wall in a quarter of a brick. Reduce the blower length, for this put the bricks on the edge. From the back of the wall, release the brick inside the slab, lay the brick perpendicular to it to get a T-shaped wall. It will serve as the basis for laying the vertical wall and installing the oven. A vertical wall is necessary to create a vertical channel between the oven and the right side wall. Round the edge of the brick under the oven. Inside the masonry from the left partition, put the half-brick on which the oven will rest.
Block the chimney on the sixth row of masonry, and the dressing of the seams should be carefully observed. This masonry is similar to the previous row. Install the oven on the seventh row of the masonry. It should deviate from the right side of the oven by 9 cm, from the partition from the left side by 4 cm. Install a partition in line with the right side and the back of the oven. This will result in two channels: the first heats the back and left walls of the oven, the second - the right. Reduce the blower in length, close the door.
Reduce the hole above the blower on the eighth row of masonry to the size of the grate overlap. On the ninth row, install the furnace door and the grate, finish the laying of the vertical partition between the oven and the furnace.
Block the holes between the oven and the partition on the tenth row of masonry, laying a brick with a slight slope. Sew and round the edges of the brick. Then close the channel on the left side of the oven so that it remains only on the right side.
Masonry on the eleventh row strictly horizontally with careful strapping. Lubricate the oven with a layer of clay mortar (10-15 mm) on top. Between the cast-iron stove and the top of the oven should remain a space of at least 70 mm in height. Place a cast-iron stove on a small layer of clay mortar with a large burner above the oven.
Build a stove in the country is quite simple. For this purpose, you only need the right tool and material. This case needs to be approached especially responsibly. Otherwise, serious problems may arise in the future.

Instruction manual
For masonry use only ceramic solid brick. Heat-resistant brick made of fireclay or dinas is well suited for cladding firebox. Its thermal conductivity is much lower compared to ordinary red brick. A stove whose base is made of fireclay bricks will take much longer to warm up. In addition, this material is twice as expensive.
Masonry should be done on a clay solution. Note that the seam must be thin. The optimal thickness of a high-quality furnace seam is 3 mm. The solution should have a consistency of medium sour cream, that is, not thick and not liquid. For laying every 100 bricks, about 25 liters of mortar will be required. A properly prepared solution is a guarantee of the durability of the furnace. Take it very seriously, otherwise masonry may crack in the future. This will lead to poor traction, violation of fire safety, as well as smoke in the room.
It is recommended to soak the bricks in water for six hours before laying. When working, use a rubber mallet to tap bricks. In no case do not shift the finished rows. It is best to smear clay on a brick with a hand.
A pickaxe is well suited for chipping and scoring. If possible, it is best to use an angle grinder. You can use a cast iron plate as a shutoff plate. It can be quite easily found in stores. For the top plate, purchase a special plate that has a hole. This hole must be closed with removable cast iron round inserts. Dishes on such a tile will heat up much faster. The fact is that it is directly affected by the flame. Remember, it will get dirty too quickly. You only need to install the furnace door, which is designed to supply firewood to the furnace and isolate the flame from the room.
Many, having a house in the village, are faced with the need to shift the stove. It is not always possible to find a specialist, so a traditional national savvy can help out.

Basic rules for laying the furnace
Getting to the laying of the furnace, you need to study the available drawings well and strictly adhere to the instructions. The national Russian stove is laid on the foundation during masonry. You can make it yourself from improvised means: stone, concrete or old brick. The prepared foundation should be 10 cm above the floor. It is also necessary to choose the best place in the room so that the stove evenly warms up the house and the pipe above it is straight, high and without knees. Between the wall of the house and the stove you need to lay out a brick gasket with a thickness of ½ part of the brick and a layer of non-combustible insulation. Suitable for this role soaked in clay felt. From the inner surface of the furnace to the wall should be 25-30 cm, and from the door of the furnace to the opposite wall not less than 1.25 m.
Masonry furnaces require a professional approach and careful adherence to technology.
During masonry, it is necessary to observe the correct dressing of the seams and check the geometric proportions using a plumb line and level, as well as a cord that is pulled along the perimeter of the future furnace to speed up work. When laying the furnace, it is necessary to carefully lubricate the seams and rub the excess clay. All cracks should be well lubricated with clay, there should be no voids in them, and the thickness of the seams should not exceed 0.5 cm.
The composition of the solution and the order of kneading
The solution for laying the furnace is made up of clay, river sand and water. The volume of water should be no more than ¼ of the volume of the entire solution. The amount of sand required to add to the solution depends on the quality of the clay. The fatter the clay, the more it will be needed. Sand is sifted through a sieve with a diameter of 1.5 - 2 cm, so that there are no large stones, for uniform concentration.
The solution is prepared in advance. It is necessary to fill with water a mixture of sand with clay in a wide and low capacity and leave for a day to swell. Then the solution is thoroughly mixed with a construction mixer. Remaining unbroken lumps must be removed.
A Russian stove, laid out according to unique drawings, can become an element of the decor of the room.
The quality of the solution is determined by touch - when rubbing between the fingers, a layer of grains of sand should be felt. If only a greasy film is felt, then you need to add more sand. Then take a handful of the solution and squeeze your hand into a fist. It should pass freely between the fingers.
Of course, you cannot immediately master the art of masonry furnaces. However, even if you do not risk putting the stove yourself, but invite a professional stove-maker, it will be useful to know the basic principles of its operation.
Sources:
- Detailed furnace drawings in 2017
If you want to change the heating to a new one, gas or electric, or decide to put down a new stove, then you need to disassemble the old one. When disassembling the stove, some points must be taken into account.

Instruction manual
Having disassembled the chimney on the roof, go to the attic.
Continue to disassemble the pipe outlet, already in the house.
Sources:
- Vaz 2108 how to disassemble the stove
Cooking bake mainly required in rural areas where there is no natural gas. Cooking bake used for cooking in the house, summer kitchen, and you can also fold a small bake for a camp in the forest.

You will need
- In order for you to be able to lay down the cooking stove you need to have the skills of a bricklayer, and have the necessary tools: a trowel (such a special trowel for the stove-maker), a hammer and a plumb.
Instruction manual
In order to fold the cooking bake you need about 300 red bricks, as well as 30 pieces of refractory bricks. It is also necessary to soak a bucket of 6 red clay in any container 3 days before the start of laying the furnace, the clay should be plastic brown. In addition to clay, about 20 buckets of sand will be required. It is still necessary to buy in hardware stores: a cast-iron stove with two burners, a cast-iron large door, a cast-iron small door for blowing, as well as a latch view, with which the chimney will be closed and the last thing you need is also a cast-iron grate. Before laying the furnace, it is necessary to lay the foundation under it. Under the foundation we dig a hole 40 cm deep, we make the foundation of stone or of unfit brick, above the floor level in the room at the foundation we lay out 1 row of brick with a spoon. We make the foundation on a cement-sand mortar.
After waiting a few days until the foundation gets stronger, we begin to lay bake. First, for waterproofing, we put 1 layer of roofing material on the cement mortar on the foundation plane, then we put the 1st row of bricks on the roofing material with a spoon, so from the floor level there are 2 rows of bricks, the dimensions of the stove should be: a furnace of the size of a cast-iron stove plus 25 centimeters. After laying the second row, if you are an inexperienced stove-maker, then find the serial drawings of the furnace in books or on the Internet. If you want to try putting yourself bake, then keep in mind that the most important thing in the furnace is the air draft, so the air must penetrate into the blower, then get into the furnace, from the furnace into the chimney and through the pipe to the street, so always think about where the air and smoke go, the minimum the size of the chimney and duct should be at least half of the brick!
Features of the masonry. The clay solution must be prepared as follows: take a bucket of soaked clay, put in a bath, add water, stirring constantly, until it becomes like liquid sour cream, then add sand to such a state that, as they say, the solution "stood". The solution should not be sticky or liquid. When masonry near the stove, the left hand should be dry, and the right hand should serve the solution. After laying each brick, you must tap it with a trowel so that it sticks to the solution. We make a smoke exhaust pipe at the end of the stove, bringing it to the height you need to make. To the blower door, as well as to the furnace door, it is necessary to screw the iron wire into the existing holes, so that, having walled it, the doors are more firmly fixed. 3 rows after the blower door we put the furnace door, 3 rows after the furnace door we put the stove. Then, after laying the pipe, you can start plastering the furnace, for this you need to add sand and water to the existing solution. Good luck and good luck!
note
Do the first furnace of the furnace no earlier than a day after laying, in order to avoid cracking of the clay solution.
Helpful advice
To ensure that the corners of the furnace are even, weave the threads from the ceiling to the corners of the furnace 1 row of masonry. Lay the firebox inside with a refractory brick.
Sources:
- These are different stoves. in 2017
- how to fold the stove in the country in 2017
In winter, the problem of heating the inside of a car becomes more relevant than ever, and if the radiator of the heating system in your car is clogged with dirt, more and more time is required for heating. To ensure good access to warm air, rinse the stove at car, and it’s most convenient to do this without disassembling the entire control panel.

You will need
- - two hoses;
- - clamps and tape FUM;
- - compressor;
- - a vacuum cleaner;
- - pump;
- - a tank for draining the liquid;
- - acid, anti-scale, special means for cleaning the radiator, etc.
Instruction manual
Look into the engine compartment of your car and find two hoses coming from the stove. Release these hoses, in different cars different actions are required for this. One way or another, carefully remove all interfering parts and remember the sequence of actions, fold fasteners separately.
After releasing the ends of the hoses, extend them with watering, from the old washing machine or any other hoses. Securely fasten the joint with clamps and FUM tape to ensure tightness, otherwise you can spoil the interior.
Lower the lower hose, it will be a drain, and raise the upper one above the level of the stove (if possible, above the panel in the cabin). Blow out the remaining water with a compressor or vacuum cleaner (if available).

Instruction manual
At the end of the summer season, inspect the stove and chimney for cracks and crevices between the bricks. If the stove is whitewashed, then they are very easy to identify by traces of soot on the whitewash. Coat small cracks with clay mortar, cover large cracks with clay and crushed stone. Thoroughly clean the furnace and chimney from ash and soot. Do not leave the shutters closed: if they freeze, when you open them, you risk jamming or breaking them.
Prepare firewood in advance. Deciduous trees - birch, oak, aspen are preferred. Fold them in a place well protected from rain and snow and dry for 1-2 years. If the furnace is heated with raw wood, a significant part of the heat (from 30 to 50%) will be spent on evaporating the liquid and lost, and the condensate formed will begin to destroy the chimney. Paste the logs into pieces of approximately the same size (thickness 5-10 cm, length 5-10 cm less than the dimensions of the firebox of the furnace). Store firewood in the house for 2 days, so that residual moisture can evaporate from them.
Current page: 5 (total of the book has 8 pages) [available passage for reading: 2 pages]
Chapter 18
Fourteen rare causes of stove smoke
1. During the simultaneous heating of three (or more) stoves in a large house and installing them at full thrust, all stoves begin to smoke and even die out, although their pipes may not be connected by horizontal wells to exit into one pipe. The cause of this may be the formation of a vacuum plug inside the house. Stoves begin to require a more active air supply for the process of complete combustion of fuel than the house can provide.
Elimination of the cause: to heat the furnace alternately.
2. In multi-apartment and two-story houses, where the outlet openings of chimneys and ventilation wells are made in the same masonry according to the principle of chimney batteries, this phenomenon may be present. When the furnace is heated, smoke from the outlet of one furnace, according to the principle of overturning the draft (see paragraph 1 of Chapter 4), begins to actively enter one of the neighboring smoke (or ventilation) openings and from there to the neighboring room.
Elimination of the cause: increase the height of one of the problematic holes by 1 or 1.5 m.
3. There is also a very rare, but unpleasant phenomenon, the fight against which presents very serious technological difficulties. When there is a heating stove and a high staircase in one room (for example, a bell tower in a temple), a chronic and constant airflow occurs along the staircase aisle leading to the top of the bell tower. In the furnace zone of the furnace, accordingly, rarefaction of air is formed, and in the zone of the chimney of the furnace - a chronic and constant movement of air flow from the street to the room. Since the cross section of the corridor leading upward is ten times greater than the cross section of the chimneys of the furnace, then at least three times higher than the bell tower, raise the chimney - there will be no sense. All smoke will still go into the room, not into the chimneys. Intensive heating of the air in the furnace tube can for some time establish the normal direction of traction, but this is not for long. Sooner or later, everything with inexorable constancy will be back to square one.
Elimination of the cause: sealing the corridor going up, or installing the stove in another room.
4. Some stoves have an exhaust hood and a well above the stove, which, for the sake of saving bricks, goes to the same main line with the smokestack of the stove. When you open such a very illiterate constructed "exhaust" system, the draft in the furnace drops sharply (due to depressurization of the outlet smoke well) and the furnace begins to smoke actively.
Elimination of the cause. It is impossible to use such an “exhaust” system during the furnace firing.
5. Too long horizontal burs in the attic (more than 3 m), as well as turns of the chimney flues at a right angle.
Elimination of the cause: remove or significantly reduce burs. Bring a straight pipe to a new location. If this is necessary, then if possible, round off straight turns.
6. The number of revolutions of the furnace is too high (more than five or seven wells).
Elimination of the cause: “Parallelize” the chimneys of the furnace by making additional holes between the blind partitions of the smoke channels (better than the first from the furnace outlet), turning two consecutive wells into one double parallel one (Fig. 14).
Fig. 14. Schemes of rational parallelization of two or more wells inside the furnace, side view
7. The number of turns of the smoke stream (at right angles) exceeds 12.
Elimination of the cause: same as in paragraph 6.
8. The stove in the "machine gun queue" mode begins to produce frequent smoke emissions into the living room. The reason for this phenomenon may be the not quite reasonable arrangement of the blower holes in the furnace furnace, which causes short-pulse air turbulence directly in the furnace itself (Fig. 15).

Fig. 15. The location of the lateral blowing holes: a) incorrect; b) right, front view
Elimination of the cause: cut through the new blower holes, and lay the upper ones.
Too many stoves with improperly located blow holes in the furnace may not produce frequent smoke emissions inside the living room. The reason for this "humble" behavior of improperly placed blowing openings of the furnace of the furnace is nothing but the unsatisfactory force of the total traction in the furnace! With all the ensuing negative consequences, of course. If in such a furnace equipped with a firebox with improperly located blow holes (see Fig. 15), an experienced furnace master “digs in” and establishes a normal (and therefore, necessarily double) supply of traction, the aforementioned furnace furnace will certainly start to “shoot”.
9. Cracks inside the hearth of the furnace, standing on a fireproof foundation, as well as cracks in the smoke channels, will certainly form air leaks inside the furnace - such a depressurization of the furnace’s internal heat line always significantly weakens the overall traction and can be a hidden cause of smoke.
Elimination of the cause: if necessary, it is necessary to open the floors and eliminate all detected air leaks.
10. Narrow outlet pipe.
Elimination of the cause: install a new pipe with a diameter of at least 16 cm.
11. Low pipe.
Elimination of the cause: temporarily raise the pipe height by 1.5–3 m. If this does not give a real tangible effect, it would be wise to look for the reason for the smoke of the furnace elsewhere.
The general technical standard for the height of the pipe for the normal functioning of the furnace is 5 m from the surface of the grate. But, as practice shows, if the furnace is folded correctly, then with a three-meter pipe height, the draft will be quite satisfactory
12. Too wide a pipe (with a diameter of more than 30 cm). The total heat of the furnace leaving the chimney, which is too large in diameter, will not be enough to organize active heat flow. Cold and warm air will mix and form counter-flows and swirls.
Elimination of the cause: reduce the diameter of the pipe to 25–16 cm.
13. Periodic smoke emissions into the living room due to gusts of wind on the street:
a) if the pipe relative to the ridge is at a distance (horizontal) of less than 1.5 m, then it is necessary to make the level of the pipe higher than the ridge by 0.5 m;
b) if the pipe is (horizontally) within 1.5–3 m to the ridge, it is necessary that its level is not lower than the ridge;
c) if the pipe is located at a distance of more than 3 meters from the ridge, measures must be taken to ensure that its level is 10 ° below the level of the ridge horizontally;
d) if the overturning of wind flows is caused by a tree standing nearby or by a wall of a tall house, then at the pipe outlet it is worthwhile to install a windproof visor of the appropriate shape.
14. During the summer, birds made a nest in the chimney.
Of course, there can be several reasons for smoke. However, each of them will need to be detected and eliminated - because without this it is impossible to achieve stable and even traction in all operating modes of the furnace.
Chapter 19
Furnace troubleshooting and repair
Minor repairs1. The closing of the formed cracks in the masonry:
a) the crack is deepened by 2-3 cm and cleared;
b) the cleaned place is wetted with water (and not in advance, but immediately at the very last moment before grouting) and a liquid stove solution is rubbed into it;
2. Replacing the hearth brick:
a) cracked and crumbling hearth bricks are removed;
b) “dry”, suitable bricks are selected and installed either on sand or on a liquid stove solution, depending on the initial technology of laying the hearth.
3. Replacing individual bricks:
a) the old kiln solution is completely removed from the joints of the problem brick along its entire perimeter;
b) "dry" is fitted with a new brick and installed in a pre-moistened nest on a liquid furnace solution.
4. Replacing the grate:
a) a new grille is installed with mandatory consideration of thermal clearances (0.5 cm);
b) usually it is placed without a stove solution; thermal gaps are covered with sand or ash;
c) it is important to take into account the correct location of the slopes (see Fig. 10, but) and the proper position of the grating (see Fig. 10, b) It is also necessary to take into account the correct proportions of the blower chamber described in paragraph 1 of chapter 25.
5. Relocation of the lining (without disassembling the walls of the furnace):
a) the plate is removed, the entire lining brick is removed;
b) everything is thoroughly cleaned of the old furnace solution and re-laid out taking into account the recommendations given in paragraph 19 of chapter 15.
6. Hog repair:
a) if necessary, provide additional lighting;
b) special attention should be paid to the presence of cracks and cracks in the lower part of the transition of the vertical well to the horizontal (Fig. 16);

Fig. 16. Layout of the most problematic place in the hog (essential for houses with wooden walls), sectional side view
c) in the presence of cracks larger than 1–1.5 cm, indicated in the problem location in Fig. 16, the entire hog knee is shifted again.
7. Replacing or reinforcing the furnace door frame:
a) old fasteners are removed;
b) if necessary, change the method of fastening in the furnace seams in the outer walls of the furnace, drill new through holes for wire fasteners, taking into account the recommendations given in Fig. eight, but and b (see paragraph 7 of chapter 15);
c) wire rods are inserted into the drilled holes with a margin. After the door is installed on the seat and its rigid fixation, the spare wire segments are laid in pre-cleaned seams with double rotation at right angles to a depth of about 2 cm;
d) between the masonry and the frame of the furnace door, a thermal clearance of 0.5 cm should be left, taking into account the recommendations given in chapter 17 (explanation to paragraph 4).
Medium Repair1. Replacing the furnace furnace:
a) one of the walls of the furnace furnace is removed;
b) a new wall is laid out instead of the removed one;
c) the second wall of the furnace is removed and a new one is laid out (all firebox bricks are replaced alternately around the perimeter).
2. Elimination of blockages in vertical chimneys:
a) the wall of the furnace is partially disassembled in the place where the internal partition is necessary;
b) the partition and the disassembled section of the wall are restored, then the following sections are disassembled, etc. All zones of the smoke channels are alternately viewed (or repaired).
3. Repair of a brick pipe outdoors:
a) all problem areas are removed and replaced one by one or the pipe is completely disassembled and repositioned;
b) the pipe is laid out on the stove solution, and when leaving the roof territory - on the cement.
Overhaul1. Complete replacement of the bottom of the heating furnace:
a) two walls are disassembled, the lining is removed;
b) the lining is restored without dressing with the main masonry of the furnace;
c) the outer walls are restored with careful preparation of the furnace seat.
2. Complete disassembly and shifting of the furnace if the hearth of a classic Russian furnace has gone into custody.
3. Change in volumes and directions of chimneys.
4. Complete replacement of one or more furnace walls.
1. Furnaces of I. S. Podgorodnikov.
2. Ovens discussed in chapter 21.
3. The heating furnace, a diagram of which is shown in Fig. 17.

Fig. 17. Diagram of one of the most technically thought-out furnaces of the century before last
This furnace can be easily converted into a cooking furnace if the furnace is placed in the side of the furnace, accordingly equipped with a stove, and the bottom of the smoke channels is lowered to the floor level.
A feature of this furnace, developed, obviously, by V. A. Stroganov, is the presence of:
a) afterburners;
b) technically competent distribution of the direction and location of the channels, allowing to achieve uniform heating of the entire area of \u200b\u200bthe smoke wells of the furnace;
c) a calibrated hole suction direct thrust;
d) just one cleaning door, which makes it easy and simple to clean all the wells; if necessary, through it you can get rid of tipping traction in the furnace;
e) furnace grates and hearths, which are arranged under well-thought-out inclinations that contribute to more efficient combustion of fuel residues than in stoves with a strictly horizontal arrangement of the grate and furnace hearth.
The furnace with this arrangement of chimneys will be uniformly heated throughout its heat transfer area. Traction in such furnaces is always good.
4. A heating furnace with horizontal chimneys (Fig. 18) is good because it does not require strict and clear fixed markings for the exit of the chimney. In pre-revolutionary times, only the senior furnace master could make such markup. Laying the foundation and laying the first row has never been trusted by apprentices. And not because it was a “matter of honor." The reason for such a strict subordination was by no means a formality, but namely the possibility of a fatal mistake.
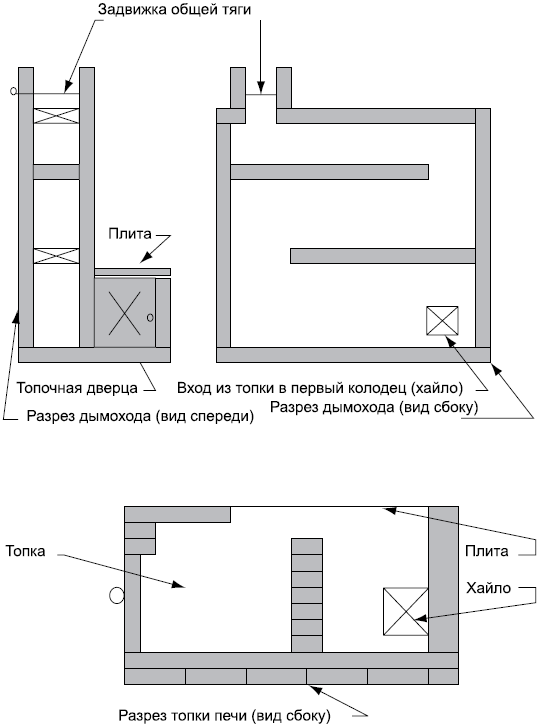
Fig. 18. The furnace of Sergei Mikhailov. The location of all technological units of the furnace is given taking into account all the laws and recommendations given in this book
The fact is that the senior furnace master had to “keep in mind” the whole furnace. He “saw” all the higher floors, directions, the number of future chimneys, etc. All this is true now, but not in relation to furnaces with a horizontal arrangement of smoke channels. Such a furnace (Fig. 18) does not require any special design skills, because all the technological difficulties in the chimney “linking” of the furnace dimensions move from a horizontal plane to a vertical one.
Furnaces with horizontal wells were undeservedly forgotten. The reason for oblivion is either ignorance or ignoring the laws described by me in chapters 28 and 29 of this book. There is an opinion that stoves with horizontal wells are supposedly quickly clogged with ash, they are more difficult to clean, etc. This is absolutely wrong. You can get rid of these completely unfounded prejudices by looking in more detail at the above chapters.
Now I will confine myself to a brief listing of the main advantages of a horizontal well furnace:
a) does not require accurate calculation when marking the first row;
b) evenly warms up (the hottest parts of the furnace, allowing intensive heat removal, are located below, while the less hot parts gradually move to the upper zone of the heated room);
c) it cools evenly (heat from the lower rows of the furnace is gradually transferred to the upper rows. And since the period of intense heat transfer and cooling of the furnace is the same period, measured over several hours, this is another plus of the furnace with horizontally located smoke channels);
d) allows for completely seamless installation of arched dryers into the furnace masonry (Fig. 19).

Fig. 19. The furnace of Sergei Mikhailov with a built-in niche-dryer, side section (the proportions of the combustion chamber are shown in Fig. 18)
If the customer completely relied on my choice, I always preferred a furnace with horizontal wells. “Complaints” about this type of stoves were surprisingly uniform: for any excess log thrown into a burning firebox, one had to pay with unbearable heat in the house.
5. Smoke wells, a diagram of which is presented in Fig. 20, can be useful when laying a heating stove, taking into account the "summer option".

Fig. 20. Well pattern: summer and winter options, side section
6. A furnace, horizontal sections of which are shown in Fig. 21, allowed the author of this book to heat it once a day, even with the onset of protracted 37-degree frosts. At the same time, the room temperature never dropped below + 19 °.

The features of this furnace circuit are as follows:
a) eight short horizontal wells;
b) the maximum heat transfer area in the lower part of the furnace (it is recommended to lay the furnace on a trench hearth, see Fig. 11, and also paragraph 11 of Chapter 15);
c) significant heat capacity;
d) additional valve with a “summer option”;
e) horizontal remote “sunbed”, on which it is convenient to dry wet shoes, clothes, etc.
7. The trench heating stove (Fig. 22) has one (in my opinion, insignificant) drawback: it has no grate.

Deaf under (lack of grate) in cooking and heating stoves in Soviet times was even banned by a special directive! The reason for the ban was "unsatisfactory combustion of fuel in such a firebox, firewood and especially coal, peat and briquettes." The All-Union Generalissimo for Furnace Construction, to put it mildly, went too far in this matter. But when coal, peat and briquettes are used as fuel, it is really impossible to do without a grate in the furnace.
A feature of this type of furnace is:
a) the presence of a remote (high) "deckchair";
b) the absence of a stove door, which tells the stove many of the advantages of a fireplace with its high efficiency;
c) very good heating of the lowest layers of air in a living room. But this is very important when there are small children in the house - as you know, most of the time they spend on the floor.
I note that in this oven bread is baked well and evenly.
I also had to heat the indicated furnace only once a day, even during the most severe and prolonged frosts.
Many authors of books about the stove business that I respect have expressed serious doubts that the stove, when the furnace door is open, will keep the house warm. Indeed, at the same time, the internal walls of the chimneys are cooled by air that is not involved in the chemical processes of complete combustion of fuel.
All this is fair. But not for the type of furnace shown in fig. 22. After all, she, as mentioned above, generally does not have a stove door. Why is that? Briefly explain:
a) the inlet area was, of course, not chimney, it had a height of 25 cm and a width of 30 cm. Even the smallest increase in these sizes would necessarily lead to a weakening of the overall draft of the furnace and even to the fact that it would start to smoke;
b) there were no grates in the furnace;
c) a high firebox, obviously, significantly slowed down the speed of movement of air masses, and the air slowly passing through the firebox had time to thoroughly warm up. A characteristic feature of this furnace was that after three years of its intensive operation, I could not scrape up even half a liter of ash residues at the entrance to the first horizontal rise (where the most ash usually accumulates).
8. In fig. 23 shows a diagram of a Dutch cooking and heating dutch.

Actually, cooking Dutch heating simply does not happen. The Dutch is a heating stove without a stove, the wells of which are located above the firebox. But the popular opinion was that the furnace, the wells of which are above the furnace, is Dutch. And in the hinterland for the Dutch they generally take any stove, at least slightly different from the classical Russian.
This oven is convenient in a space-limited room. Its characteristic features are:
a) a vertical pillar at the rear of the furnace, designed to support the stove;
b) trenches, which very significantly increases the area of \u200b\u200bintensive heat removal;
c) horizontal wells, the merits of which were mentioned in paragraph 4 of this chapter;
d) significant (almost maximum) heat capacity intended for furnaces of average power of a periodic furnace.
It is indisputable that furnaces designed for permanent heating can have a large heat capacity. But it must be borne in mind that the combustion processes in continuous furnaces, and even more so in furnaces designed for solid and liquid fuels, as well as the principles of constructing a furnace and furnace chambers (continuous operation) will significantly differ from the principles recommended for batch furnaces (1, 5–2 hours of heating every morning and evening)
Briefly about the differences between batch and continuous furnaces, the following can be said. In a periodic furnace, after 0.5–1 hours, the inner surface of the walls can heat up to 800–900 ° C. Hence the inevitable appearance of cracks and gaps in the furnace joints in the first year of operation of batch furnaces. With continuous combustion, fuel consumption is sharply reduced (in relation to coal, gas and liquid fuel) and the temperature of the heating of the walls decreases to 450–500 ° C. Therefore, the burners of batch ovens are usually lined with refractory bricks (the temperature limit of high-quality red bricks usually reaches only 700–750 ° C), and the burners of continuous furnaces do not need this (excluding the use of anthracite).
9. In fig. 24 is a diagram of a summer kitchen stove.

Fig. 24. The simplest kitchen stove
Its characteristic features are as follows:
a) a very low firebox height - only 21 cm (if someone does not like this size, the height of the firebox can be raised, but in this case, firewood will need two to three times more for cooking).
It is best to use an old picket fence and unnecessary lumber residues as firewood in a furnace with a similar furnace height. Two or three old shtaketin will be enough to prepare a full dinner in the summer for a family of six. However, in our time, when most rural residents use gas or electricity for cooking, a stove of this height is unlikely to find its mass user;
b) the presence of a sparking tooth and the absence of all that is superfluous.
To heat the room, the owners often opt for the time-tested method - the stove, and the heat that it gives. To bring this method to life, it is necessary that the house was built rude.
They come in several forms. Previously, when they used open fire for cooking, there could be two stoves in the house - one for cooking, the other for heating. In small houses laid out universal designs, at the same time suitable for domestic needs and heating. Such stoves were built with the house and were located between the adjacent wall, giving heating to two rooms. The scheme is quite complex and the process of its implementation is laborious, but the amenities are obvious. There was a possibility (especially for the summer season) that only the stove was heated. This greatly facilitated life, because such an attribute in the house needed constant care.
It consists in a set of activities carried out daily or once or twice a year. With intensive use, the coarse gravel needs to be cleaned of accumulated ash. A large amount of it will interfere with the normal air circulation, which is why firewood will not be completely burned.
In addition, periodically you need to clean the chimney from the ashes on its walls. For convenience, the masters when installing the oven install small doors.
Another nuance in using a brick oven is cracking of its finish. Experienced users are advised not to overheat the surface. A normal temperature is considered to be 17-18 degrees, and the features of the brick allow you to save moisture indoors. Such a microclimate gives only the use of the oven, other heating devices often dry the air, and lower temperatures make it feel damp and cool in the room.
Types of furnaces
Modern stoves do not have to perform two functions, it is much faster and more convenient to cook on a gas or electric stove. After all, such a resource is available even in remote villages. Almost the entire territory of Russia is supplied with electricity, gas is sold in cylinders, and with moderate use, it will be enough for several months.
The main types of furnaces are distinguished:
- channel;
- bell-shaped;
- chamber.
Each option has its own individual characteristics, which should be disassembled separately.
Channel oven
The furnaces laid out according to the principle of the channel scheme are very simple in execution and further operation. They consist of a sequential system of compartments (channels) and a gas convector through which heat flows circulate. The convector and the firebox are interconnected only by the mouth. This design is a significant minus, because any ingress of cold air significantly reduces the internal temperature in the furnace, dramatically cooling it. The efficiency of such furnaces is quite low - up to 40%. Another significant drawback is the inability to attach a water tank.
What is a bell furnace, its features
Bell furnaces got their name due to the shape of the vault; it really resembles a bell. And although the diagram and drawings look very simple, only a very experienced master can bring them to life. Any displacement from the center will not allow the furnace to work as intended. The absence of barriers to heat fluxes contributes to the complete combustion of gases. Such work requires maximum efficiency and energy saving, in addition, its shape and the accumulation of gases under the arch form a reliable barrier to air from the outside. This feature allows you not to heat the street, but to direct heat to the surface of the furnace, which makes its efficiency equal to 70%.
The most popular type of coarse for a small house
 Chamber furnaces are the most popular. Firstly, they are effective, suggest the possibility of mounting a heat exchanger, hob, oven, acting as a camera. The heat that is redirected from the furnace flows around the oven, evenly distributed over the stove. The convector is placed behind the stove, and if it is slightly expanded during construction, it can qualitatively warm two or three rooms with rhinestones. The energy that comes from the furnace, if you open the door, is enough to warm the room as soon as possible. A stove and a house that have not been used for a long time cannot quickly reach a comfortable living condition. The uniformity of heat distribution in the room is achieved due to the shape of the convector. It is laid out narrow and high from the base to the ceiling, while the entire surface warms up.
Such a furnace needs a firebox two to three times a day with a small amount of firewood and is able to retain heat in between.
How to build an oven?
The layout of a brick kiln is a sequence of actions. Their observance is an important condition. The material needs processing and precise styling in order to avoid flaws as much as possible, which then affect the functionality. The furnace is a heavy construction that needs a solid concrete foundation, which must be insulated with roofing material. If the house is already based on a monolithic base, which makes up the entire floor area, you can not make a special foundation for the stove.
The work should begin with the fact that a row of bricks or large gravel is laid, which is covered with a solution and smoothed. The next row will already be the oven. Experts advise, for a start, lay out the bricks in the place where it is supposed to lie, in order to fit all sizes and the exact location. Also, you need to soak each one in water for ten minutes. If chamotte is used, then it is enough to wipe it with a wet rag. Before starting work, you need to calculate where the chimney will go. If the construction takes place in an already finished building, it is worth calculating the place so that it is convenient to make a hole in the roof and floors.
 The first row is laid out so that the horizontal lines are oriented along one of the walls. In the place where the furnace is as close to the walls as possible, you need to lay out a second brick. This will ensure safety against fire. In place of the furnace, a metal grate is installed. There will be several of them in the design. One of them will share the furnace with a compartment for collecting ash. In the second row, you should consider the free space for the chimney and the connector in the masonry under the lower door. There will be two of them. A small one is for cleaning ash, the second one opens the furnace and is large. The doors are securely fixed with a wire between the bricks and smooth the joint with the solution. After the third row, you need to lay out two rows of brick on a spoon, cover it with a row of fireclay refractory bricks. This will serve as the basis for the combustion grate. After that, the door of the future firebox is strengthened, and its walls are laid out. The arch is formed of fireclay bricks. A fireplace will be located next to the firebox.
This design requires significant reinforcement. This can be achieved by laying horizontal metal corners, securing them with refractory bricks. The grate of the fireplace is flush with the masonry. When this part of the furnace is ready, proceed to lay out the chimney and divide it into wells. The arch of the fireplace is laid so that it goes to the chimney. At this stage, after the formation of the first row of its walls, the space is divided into wells, the doors are fixed, with the help of which soot is removed from the chimney. When everything is ready, the previously removed bricks that formed the wells are removed and secured with mortar. The chimney is laid out to the ceiling, periodically laying the gain. Under the top it is very important to make an empty space and a cornice. A sheet of tin, fixed in two rows of masonry, is placed on top of the wells. These works are already being done in the attic. Here the chimney is divided into two compartments, to each of which valves are mounted. The walls of the chimney that goes from the stove need to be strengthened and when it reaches the roof, bring it out a little higher than the ridge.